Handling Big Data with HBase Part 6: Wrap-up

Posted on December 19, 2013 by Scott Leberknight

This is the sixth and final blog in an introduction to Apache HBase. In the fifth part, we learned the basics of schema design in HBase and several techniques you can use to make scanning and filtering data more efficient. We also saw two different basic design schemes ("wide" and "tall") for storing information about the same entity, and briefly touched upon more advanced topics like adding full-text search and secondary indexes. In this part, we'll wrap up by summarizing the main points and then listing the (many) things we didn't cover in this introduction to HBase series.

HBase is a distributed database providing inherent scalability, performance, and fault-tolerance across potentially massive clusters of commodity servers. It provides the means to store and efficiently scan large swaths of data. We've looked at the HBase shell for basic interaction, covered the high-level HBase architecture and looked at using the Java API to create, get, scan, and delete data. We also considered how to design tables and row keys for efficient data access.

One thing you certainly noticed when working with the HBase Java API is that it is much lower level than other data APIs you might be used to working with, for example JDBC or JPA. You get the basics of CRUD plus scanning data, and that's about it. In addition, you work directly with byte arrays which is about as low-level as it gets when you're trying to retrieve information from a datastore.

If you are considering whether to use HBase, you should really think hard about how large the data is, i.e. does your app need to be able to accomodate ever-growing volumes of data? If it does, then you need to think hard about what that data looks like and what the most likely data access patterns will be, as this will drive your schema design and data access patters. For example, if you are designing a schema for a weather collection project, you will want to consider using a "tall" schema design such that the sensor readings for each sensor are split across rows as opposed to a "wide" design in which you keep adding columns to a column family in a single row. Unlike relational models in which you work hard to normalize data and then use SQL as a flexible way to join the data in various ways, with HBase you need to think much more up-front about the data access patterns, because retrieval by row key and table scans are the only two ways to access data. In other words, there is no joining across multiple HBase tables and projecting out the columns you need. When you retrieve data, you want to only ask HBase for the exact data you need.

Things We Didn't Cover

Now let's discuss a few things we didn't cover. First, coprocessors were a major addition to HBase in version 0.92, and were inspired by Google adding coprocessors to its Bigtable data store. You can, at a high level, think of coprocessors like triggers or stored procedures in relational databases. Basically you can have either trigger-like functionality via observers, or stored-procedure functionality via RPC endpoints. This allows many new things to be accomplished in an elegant fashion, for example maintaining secondary indexes via observing changes to data.

We showed basic API usage, but there is more advanced usage possible with the API. For example, you can batch data and provide much more advanced filtering behavior than a simple paging filter like we showed. There is also the concept of counters, which allows you to do atomic increments of numbers without requiring the client to perform explicit row locking. And if you're not really into Java, there are external APIs available via Thrift and REST gateways. There's also even a C/C++ client available and there are DSLs for Groovy, Jython, and Scala. These are all discussed on the HBase wiki.

Cluster setup and configuration was not covered at all, nor was performance tuning. Obviously these are hugely important topics and the references below are good starting places. With HBase you not only need to worry about tuning HBase configuration, but also tuning Hadoop (or more specifically, the HDFS file system). For these topics definitely start with the HBase References Guide and also check out HBase: The Definitive Guide by Lars George.

We also didn't cover how to Map/Reduce with HBase. Essentially you can use Hadoop's Map/Reduce framework to access HBase tables and perform tasks like aggregation in a Map/Reduce-style.

Last there is security (which I suppose should be expected to come last for a developer, right?) in HBase. There are two types of security I'm referring to here: first is access to HBase itself in order to create, read, update, and delete data, e.g. via requiring Kerberos authentication to connect to HBase. The second type of security is ACL-based access restrictions. HBase as of this writing you can restrict access via ACLs at the table and column family level. However, HBase Cell Security describes how cell-level security features similar to Apache Accumulo are being added to HBase and are scheduled to be released in version 0.98 in this issue (the current version as of this writing is 0.96).

Goodbye!

With this background, you can now consider whether HBase makes sense on future projects with Big Data and high scalability requirements. I hope you found this series of posts useful as an introduction to HBase.

References

Handling Big Data with HBase Part 5: Data Modeling (or, Life without SQL)

Posted on December 17, 2013 by Scott Leberknight

This is the fifth of a series of blogs introducing Apache HBase. In the fourth part, we saw the basics of using the Java API to interact with HBase to create tables, retrieve data by row key, and do table scans. This part will discuss how to design schemas in HBase.

HBase has nothing similar to a rich query capability like SQL from relational databases. Instead, it forgoes this capability and others like relationships, joins, etc. to instead focus on providing scalability with good performance and fault-tolerance. So when working with HBase you need to design the row keys and table structure in terms of rows and column families to match the data access patterns of your application. This is completely opposite what you do with relational databases where you start out with a normalized database schema, separate tables, and then you use SQL to perform joins to combine data in the ways you need. With HBase you design your tables specific to how they will be accessed by applications, so you need to think much more up-front about how data is accessed. You are much closer to the bare metal with HBase than with relational databases which abstract implementation details and storage mechanisms. However, for applications needing to store massive amounts of data and have inherent scalability, performance characteristics and tolerance to server failures, the potential benefits can far outweigh the costs.

In the last part on the Java API, I mentioned that when scanning data in HBase, the row key is critical since it is the primary means to restrict the rows scanned; there is nothing like a rich query like SQL as in relational databases. Typically you create a scan using start and stop row keys and optionally add filters to further restrict the rows and columns data returned. In order to have some flexibility when scanning, the row key should be designed to contain the information you need to find specific subsets of data. In the blog and people examples we've seen so far, the row keys were designed to allow scanning via the most common data access patterns. For the blogs, the row keys were simply the posting date. This would permit scans in ascending order of blog entries, which is probably not the most common way to view blogs; you'd rather see the most recent blogs first. So a better row key design would be to use a reverse order timestamp, which you can get using the formula (Long.MAX_VALUE - timestamp), so scans return the most recent blog posts first. This makes it easy to scan specific time ranges, for example to show all blogs in the past week or month, which is a typical way to navigate blog entries in web applications.

For the people table examples, we used a composite row key composed of last name, first name, middle initial, and a (unique) person identifier to distinguish people with the exact same name, separated by dashes. For example, Brian M. Smith with identifier 12345 would have row key smith-brian-m-12345. Scans for the people table can then be composed using start and end rows designed to retrieve people with specific last names, last names starting with specific letter combinations, or people with the same last name and first name initial. For example, if you wanted to find people whose first name begins with B and last name is Smith you could use the start row key smith-b and stop row key smith-c (the start row key is inclusive while the stop row key is exclusive, so the stop key smith-c ensures all Smiths with first name starting with the letter "B" are included). You can see that HBase supports the notion of partial keys, meaning you do not need to know the exact key, to provide more flexibility creating appropriate scans. You can combine partial key scans with filters to retrieve only the specific data needed, thus optimizing data retrieval for the data access patterns specific to your application.

So far the examples have involved only single tables containing one type of information and no related information. HBase does not have foreign key relationships like in relational databases, but because it supports rows having up to millions of columns, one way to design tables in HBase is to encapsulate related information in the same row - a "wide" table design. It is called a "wide" design since you are storing all information related to a row together in as many columns as there are data items. In our blog example, you might want to store comments for each blog. The "wide" way to design this would be to include a column family named comments and then add columns to the comment family where the qualifiers are the comment timestamp; the comment columns would look like comments:20130704142510 and comments:20130707163045. Even better, when HBase retrieves columns it returns them in sorted order, just like row keys. So in order to display a blog entry and its comments, you can retrieve all the data from one row by asking for the content, info, and comments column families. You could also add a filter to retrieve only a specific number of comments, adding pagination to them.

The people table column families could also be redesigned to store contact information such as separate addresses, phone numbers, and email addresses in column families allowing all of a person's information to be stored in one row. This kind of design can work well if the number of columns is relatively modest, as blog comments and a person's contact information would be. If instead you are modeling something like an email inbox, financial transactions, or massive amounts of automatically collected sensor data, you might choose instead to spread a user's emails, transactions, or sensor readings across multiple rows (a "tall" design) and design the row keys to allow efficient scanning and pagination. For an inbox the row key might look like <user_id>-<reversed_email_timestamp> which would permit easily scanning and paginating a user's inbox, while for financial transactions the row key might be <user_id>-<reversed_transaction_timestamp>. This kind of design can be called "tall" since you are spreading information about the same thing (e.g. readings from the same sensor, transactions in an account) across multiple rows, and is something to consider if there will be an ever-expanding amount of information, as would be the case in a scenario involving data collection from a huge network of sensors.

Designing row keys and table structures in HBase is a key part of working with HBase, and will continue to be given the fundamental architecture of HBase. There are other things you can do to add alternative schemes for data access within HBase. For example, you could implement full-text searching via Apache Lucene either within rows or external to HBase (search Google for HBASE-3529). You can also create (and maintain) secondary indexes to permit alternate row key schemes for tables; for example in our people table the composite row key consists of the name and a unique identifier. But if we desire to access people by their birth date, telephone area code, email address, or any other number of ways, we could add secondary indexes to enable that form of interaction. Note, however, that adding secondary indexes is not something to be taken lightly; every time you write to the "main" table (e.g. people) you will need to also update all the secondary indexes! (Yes, this is something that relational databases do very well, but remember that HBase is designed to accomodate a lot more data than traditional RDBMSs were.)

Conclusion to Part 5

In this part of the series, we got an introduction to schema design in HBase (without relations or SQL). Even though HBase is missing some of the features found in traditional RDBMS systems such as foreign keys and referential integrity, multi-row transactions, multiple indexes, and son on, many applications that need inherent HBase benefits like scaling can benefit from using HBase. As with anything complex, there are tradeoffs to be made. In the case of HBase, you are giving up some richness in schema design and query flexibility, but you gain the ability to scale to massive amounts of data by (more or less) simply adding additional servers to your cluster.

In the next and last part of this series, we'll wrap up and mention a few (of the many) things we didn't cover in these introductory blogs.

References

Handling Big Data with HBase Part 4: The Java API

Posted on December 15, 2013 by Scott Leberknight

This is the fourth of an introductory series of blogs on Apache HBase. In the third part, we saw a high level view of HBase architecture . In this part, we'll use the HBase Java API to create tables, insert new data, and retrieve data by row key. We'll also see how to setup a basic table scan which restricts the columns retrieved and also uses a filter to page the results.

Having just learned about HBase high-level architecture, now let's look at the Java client API since it is the way your applications interact with HBase. As mentioned earlier you can also interact with HBase via several flavors of RPC technologies like Apache Thrift plus a REST gateway, but we're going to concentrate on the native Java API. The client APIs provide both DDL (data definition language) and DML (data manipulation language) semantics very much like what you find in SQL for relational databases. Suppose we are going to store information about people in HBase, and we want to start by creating a new table. The following listing shows how to create a new table using the HBaseAdmin class.

Configuration conf = HBaseConfiguration.create();
HBaseAdmin admin = new HBaseAdmin(conf);
HTableDescriptor tableDescriptor = new HTableDescriptor(TableName.valueOf("people"));
tableDescriptor.addFamily(new HColumnDescriptor("personal"));
tableDescriptor.addFamily(new HColumnDescriptor("contactinfo"));
tableDescriptor.addFamily(new HColumnDescriptor("creditcard"));
admin.createTable(tableDescriptor);

The people table defined in preceding listing contains three column families: personal, contactinfo, and creditcard. To create a table you create an HTableDescriptor and add one or more column families by adding HColumnDescriptor objects. You then call createTable to create the table. Now we have a table, so let's add some data. The next listing shows how to use the Put class to insert data on John Doe, specifically his name and email address (omitting proper error handling for brevity).

Configuration conf = HBaseConfiguration.create();
HTable table = new HTable(conf, "people");
Put put = new Put(Bytes.toBytes("doe-john-m-12345"));
put.add(Bytes.toBytes("personal"), Bytes.toBytes("givenName"), Bytes.toBytes("John"));
put.add(Bytes.toBytes("personal"), Bytes.toBytes("mi"), Bytes.toBytes("M"));
put.add(Bytes.toBytes("personal"), Bytes.toBytes("surame"), Bytes.toBytes("Doe"));
put.add(Bytes.toBytes("contactinfo"), Bytes.toBytes("email"), Bytes.toBytes("john.m.doe@gmail.com"));
table.put(put);
table.flushCommits();
table.close();

In the above listing we instantiate a Put providing the unique row key to the constructor. We then add values, which must include the column family, column qualifier, and the value all as byte arrays. As you probably noticed, the HBase API's utility Bytes class is used a lot; it provides methods to convert to and from byte[] for primitive types and strings. (Adding a static import for the toBytes() method would cut out a lot of boilerplate code.) We then put the data into the table, flush the commits to ensure locally buffered changes take effect, and finally close the table. Updating data is also done via the Put class in exactly the same manner as just shown in the prior listing. Unlike relational databases in which updates must update entire rows even if only one column changed, if you only need to update a single column then that's all you specify in the Put and HBase will only update that column. There is also a checkAndPut operation which is essentially a form of optimistic concurrency control - the operation will only put the new data if the current values are what the client says they should be.

Retrieving the row we just created is accomplished using the Get class, as shown in the next listing. (From this point forward, listings will omit the boilerplate code to create a configuration, instantiate the HTable, and the flush and close calls.)

Get get = new Get(Bytes.toBytes("doe-john-m-12345"));
get.addFamily(Bytes.toBytes("personal"));
get.setMaxVersions(3);
Result result = table.get(get);

The code in the previous listing instantiates a Get instance supplying the row key we want to find. Next we use addFamily to instruct HBase that we only need data from the personal column family, which also cuts down the amount of work HBase must do when reading information from disk. We also specify that we'd like up to three versions of each column in our result, perhaps so we can list historical values of each column. Finally, calling get returns a Result instance which can then be used to inspect all the column values returned.

In many cases you need to find more than one row. HBase lets you do this by scanning rows, as shown in the second part which showed using a scan in the HBase shell session. The corresponding class is the Scan class. You can specify various options, such as the start and ending row key to scan, which columns and column families to include and the maximum versions to retrieve. You can also add filters, which allow you to implement custom filtering logic to further restrict which rows and columns are returned. A common use case for filters is pagination. For example, we might want to scan through all people whose last name is Smith one page (e.g. 25 people) at a time. The next listing shows how to perform a basic scan.

Scan scan = new Scan(Bytes.toBytes("smith-"));
scan.addColumn(Bytes.toBytes("personal"), Bytes.toBytes("givenName"));
scan.addColumn(Bytes.toBytes("contactinfo"), Bytes.toBytes("email"));
scan.setFilter(new PageFilter(25));
ResultScanner scanner = table.getScanner(scan);
for (Result result : scanner) {
    // ...
}

In the above listing we create a new Scan that starts from the row key smith- and we then use addColumn to restrict the columns returned (thus reducing the amount of disk transfer HBase must perform) to personal:givenName and contactinfo:email. A PageFilter is set on the scan to limit the number of rows scanned to 25. (An alternative to using the page filter would be to specify a stop row key when constructing the Scan.) We then get a ResultScanner for the Scan just created, and loop through the results performing whatever actions are necessary. Since the only method in HBase to retrieve multiple rows of data is scanning by sorted row keys, how you design the row key values is very important. We'll come back to this topic later.

You can also delete data in HBase using the Delete class, analogous to the Put class to delete all columns in a row (thus deleting the row itself), delete column families, delete columns, or some combination of those.

Connection Handling

In the above examples not much attention was paid to connection handling and RPCs (remote procedure calls). HBase provides the HConnection class which provides functionality similar to connection pool classes to share connections, for example you use the getTable() method to get a reference to an HTable instance. There is also an HConnectionManager class which is how you get instances of HConnection. Similar to avoiding network round trips in web applications, effectively managing the number of RPCs and amount of data returned when using HBase is important, and something to consider when writing HBase applications.

Conclusion to Part 4

In this part we used the HBase Java API to create a people table, insert a new person, and find the newly inserted person information. We also used the Scan class to scan the people table for people with last name "Smith" and showed how to restrict the data retrieved and finally how to use a filter to limit the number of results.

In the next part, we'll learn how to deal with the absence of SQL and relations when modeling schemas in HBase.

References

Handling Big Data with HBase Part 3: Architecture Overview

Posted on December 12, 2013 by Scott Leberknight

This is the third blog in a series of introductory blogs on Apache HBase. In the second part, we saw how to interact with HBase via the shell. In this part, we'll look at the HBase architecture from a bird's eye view.

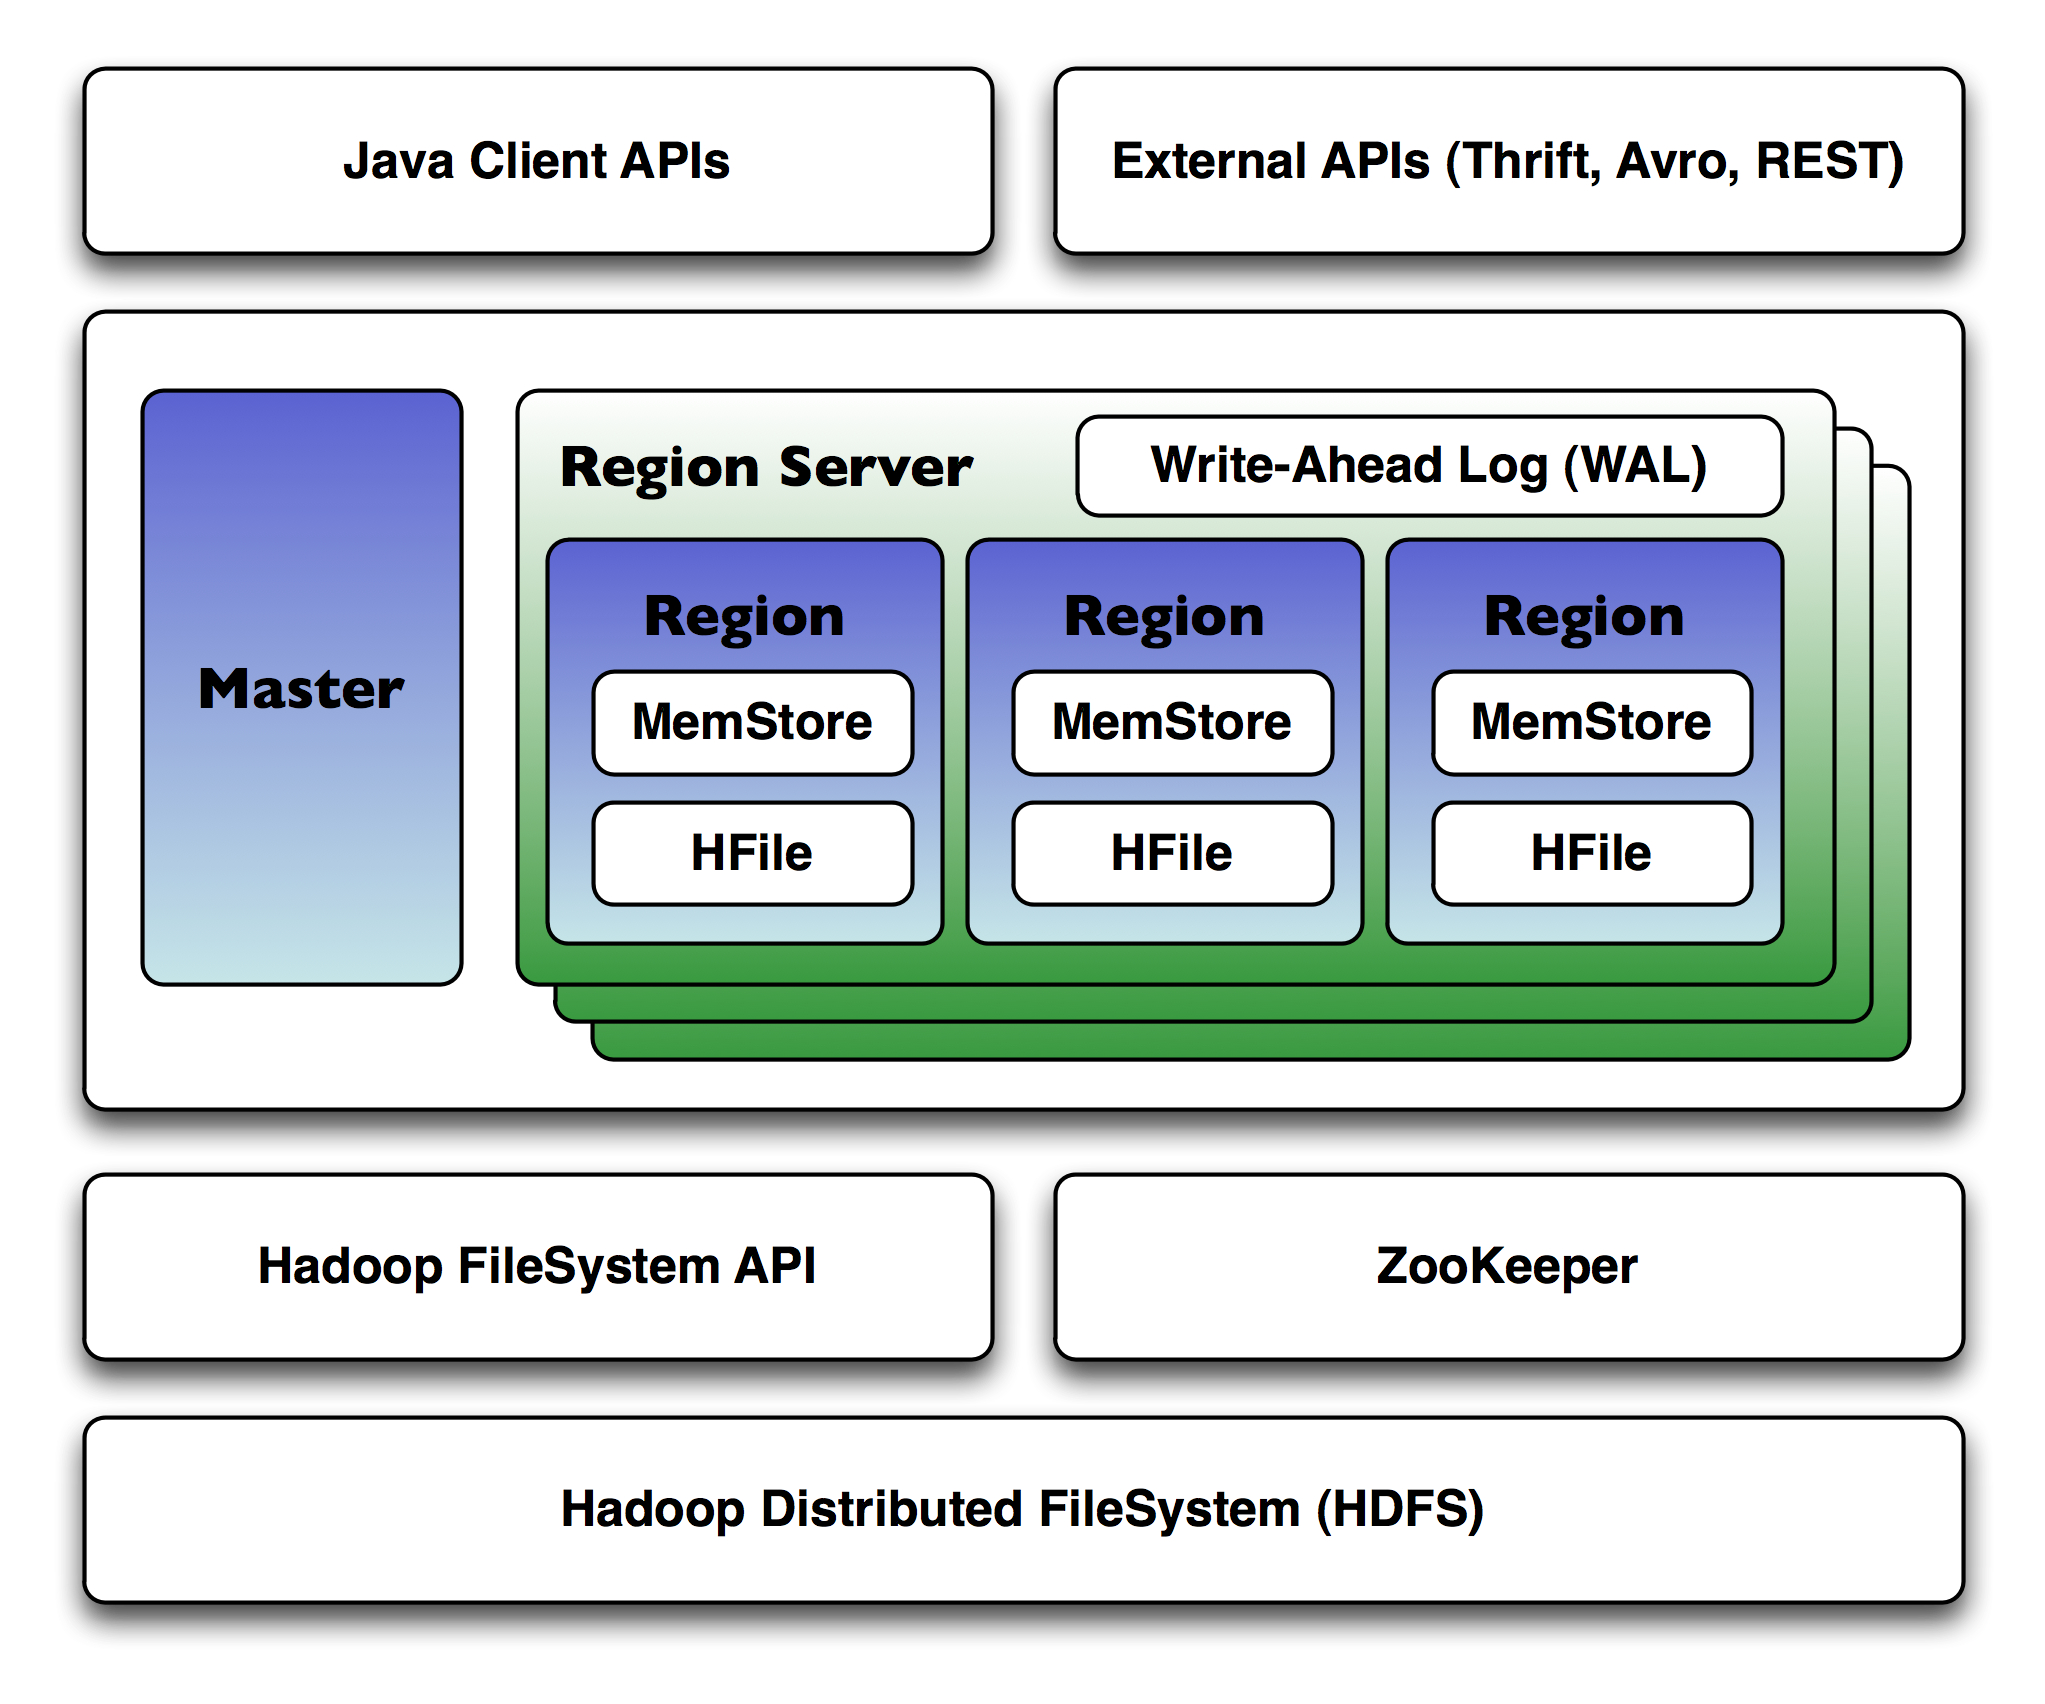
HBase is a distributed database, meaning it is designed to run on a cluster of dozens to possibly thousands or more servers. As a result it is more complicated to install than a single RDBMS running on a single server. And all the typical problems of distributed computing begin to come into play such as coordination and management of remote processes, locking, data distribution, network latency and number of round trips between servers. Fortunately HBase makes use of several other mature technologies, such as Apache Hadoop and Apache ZooKeeper, to solve many of these issues. The figure below shows the major architectural components in HBase.

HBase Architecture

In the above figure you can see there is a single HBase master node and multiple region servers. (Note that it is possible to run HBase in a multiple master setup, in which there is a single active master.) HBase tables are partitioned into multiple regions with each region storing a range of the table's rows, and multiple regions are assigned by the master to a region server.

HBase is a column-oriented data store, meaning it stores data by columns rather than by rows. This makes certain data access patterns much less expensive than with traditional row-oriented relational database systems. For example, in HBase if there is no data for a given column family, it simply does not store anything at all; contrast this with a relational database which must store null values explicitly. In addition, when retrieving data in HBase, you should only ask for the specific column families you need; because there can literally be millions of columns in a given row, you need to make sure you ask only for the data you actually need.

HBase utilizes ZooKeeper (a distributed coordination service) to manage region assignments to region servers, and to recover from region server crashes by loading the crashed region server's regions onto other functioning region servers.

Regions contain an in-memory data store (MemStore) and a persistent data store (HFile), and all regions on a region server share a reference to the write-ahead log (WAL) which is used to store new data that hasn't yet been persisted to permanent storage and to recover from region server crashes. Each region holds a specific range of row keys, and when a region exceeds a configurable size, HBase automatically splits the region into two child regions, which is the key to scaling HBase.

As a table grows, more and more regions are created and spread across the entire cluster. When clients request a specific row key or scan a range of row keys, HBase tells them the regions on which those keys exist, and the clients then communicate directly with the region servers where those regions exist. This design minimizes the number of disk seeks required to find any given row, and optimizes HBase toward disk transfer when returning data. This is in contrast to relational databases, which might need to do a large number of disk seeks before transferring data from disk, even with indexes.

The HDFS component is the Hadoop Distributed Filesystem, a distributed, fault-tolerant and scalable filesystem which guards against data loss by dividing files into blocks and spreading them across the cluster; it is where HBase actually stores data. Strictly speaking the persistent storage can be anything that implements the Hadoop FileSystem API, but usually HBase is deployed onto Hadoop clusters running HDFS. In fact, when you first download and install HBase on a single machine, it uses the local filesystem until you change the configuration!

Clients interact with HBase via one of several available APIs, including a native Java API as well as a REST-based interface and several RPC interfaces (Apache Thrift, Apache Avro). You can also use DSLs to HBase from Groovy, Jython, and Scala.

Conclusion to Part 3

In this part, we got a pretty high level view of HBase architecture. In the next part, we'll dive into some real code and show the basics of working with HBase via its native Java API.

References

Handling Big Data with HBase Part 2: First Steps

Posted on December 11, 2013 by Scott Leberknight

This is the second in a series of blogs that introduce Apache HBase. In the first blog, we introduced HBase at a high level. In this part, we'll see how to interact with HBase via its command line shell.

Let's take a look at what working with HBase is like at the command line. HBase comes with a JRuby-based shell that lets you define and manage tables, execute CRUD operations on data, scan tables, and perform maintenance among other things. When you're in the shell, just type help to get an overall help page. You can get help on specific commands or groups of commands as well, using syntax like help <group> and help command. For example, help 'create' provides help on creating new tables. While HBase is deployed in production on clusters of servers, you can download it and get up and running with a standalone installation in literally minutes. The first thing to do is fire up the HBase shell. The following listing shows a shell session in which we create a blog table, list the available tables in HBase, add a blog entry, retrieve that entry, and scan the blog table.

$ bin/hbase shell
HBase Shell; enter 'help<RETURN>' for list of supported commands.
Type "exit<RETURN>" to leave the HBase Shell
Version 0.96.0-hadoop2, r1531434, Fri Oct 11 15:28:08 PDT 2013

hbase(main):001:0> create 'blog', 'info', 'content'
0 row(s) in 6.0670 seconds

=> Hbase::Table - blog

hbase(main):002:0> list
TABLE
blog
fakenames
my-table
3 row(s) in 0.0300 seconds

=> ["blog", "fakenames", "my-table"]

hbase(main):003:0> put 'blog', '20130320162535', 'info:title', 'Why use HBase?'
0 row(s) in 0.0650 seconds

hbase(main):004:0> put 'blog', '20130320162535', 'info:author', 'Jane Doe'
0 row(s) in 0.0230 seconds

hbase(main):005:0> put 'blog', '20130320162535', 'info:category', 'Persistence'
0 row(s) in 0.0230 seconds

hbase(main):006:0> put 'blog', '20130320162535', 'content:', 'HBase is a column-oriented...'
0 row(s) in 0.0220 seconds

hbase(main):007:0> get 'blog', '20130320162535'
COLUMN             CELL
 content:          timestamp=1386556660599, value=HBase is a column-oriented...
 info:author       timestamp=1386556649116, value=Jane Doe
 info:category     timestamp=1386556655032, value=Persistence
 info:title        timestamp=1386556643256, value=Why use HBase?
4 row(s) in 0.0380 seconds

hbase(main):008:0> scan 'blog', { STARTROW => '20130300', STOPROW => '20130400' }
ROW                COLUMN+CELL
 20130320162535    column=content:, timestamp=1386556660599, value=HBase is a column-oriented...
 20130320162535    column=info:author, timestamp=1386556649116, value=Jane Doe
 20130320162535    column=info:category, timestamp=1386556655032, value=Persistence
 20130320162535    column=info:title, timestamp=1386556643256, value=Why use HBase?
1 row(s) in 0.0390 seconds

In the above listing we first create the blog table having column families info and content. After listing the tables and seeing our new blog table, we put some data in the table. The put commands specify the table, the unique row key, the column key composed of the column family and a qualifier, and the value. For example, info is the column family while title and author are qualifiers and so info:title specifies the column title in the info family with value "Why use HBase?". The info:title is also referred to as a column key. Next we use the get command to retrieve a single row and finally the scan command to perform a scan over rows in the blog table for a specific range of row keys. As you might have guessed, by specifying start row 20130300 (inclusive) and end row 20130400 (exclusive) we retrieve all rows whose row key falls within that range; in this blog example this equates to all blog entries in March 2013 since the row keys are the time when an entry was published.

An important characteristic of HBase is that you define column families, but then you can add any number of columns within that family, identified by the column qualifier. HBase is optimized to store columns together on disk, allowing for more efficient storage since columns that don't exist don't take up any space, unlike in a RDBMS where null values must actually be stored. Rows are defined by columns they contain; if there are no columns then the row, logically, does not exist. Continuing the above example in the following listing, we delete some specific columns from a row.

hbase(main):009:0>  delete 'blog', '20130320162535', 'info:category'
0 row(s) in 0.0490 seconds

hbase(main):010:0> get 'blog', '20130320162535'
COLUMN             CELL
 content:          timestamp=1386556660599, value=HBase is a column-oriented...
 info:author       timestamp=1386556649116, value=Jane Doe
 info:title        timestamp=1386556643256, value=Why use HBase?
3 row(s) in 0.0260 seconds

As shown just above, you can delete a specific column from a table as we deleted the info:category column. You can also delete all columns within a row and thereby delete the row using the deleteall shell command. To update column values, you simply use the put command again. By default HBase retains up to three versions of a column value, so if you put a new value into info:title, HBase will retain both the old and new version.

The commands issued in the above examples show how to create, read, update, and delete data in HBase. Data retrieval comes in only two flavors: retrieving a row using get and retrieving multiple rows via scan. When retrieving data in HBase you should take care to retrieve only the information you actually require. Since HBase retrieves data from each column family separately, if you only need data for one column family, then you can specify to retrieve only that bit of information. In the next listing we retrieve only the blog titles for a specific row key range that equate to March through April 2013.

hbase(main):011:0> scan 'blog', { STARTROW => '20130300', STOPROW => '20130500', COLUMNS => 'info:title' }
ROW                COLUMN+CELL
 20130320162535    column=info:title, timestamp=1386556643256, value=Why use HBase?
1 row(s) in 0.0290 seconds

So by setting row key ranges, restricting the columns we need, and restricting the number of versions to retrieve, you can optimize data access patterns in HBase. Of course in the above examples, all this is done from the shell, but you can do the same things, and much more, using the HBase APIs.

Conclusion to Part 2

In this second part of the HBase introductory series, we saw how to use the shell to create tables, insert data, retrieve data by row key, and saw a basic scan of data via row key range. You also saw how you can delete a specific column from a table row.

In the next blog, we'll get an overview of HBase's high level architecture.

References

Handling Big Data with HBase Part 1: Introduction

Posted on December 09, 2013 by Scott Leberknight

This is the first in a series of blogs that will introduce Apache HBase. This blog provides a brief introduction to HBase. In later blogs you will see how the the HBase shell can be used for quick and dirty data access via the command line, learn about the high-level architecture of HBase, learn the basics of the Java API, and learn how to live without SQL when designing HBase schemas.

In the past few years we have seen a veritable explosion in various ways to store and retrieve data. The so-called NoSql databases have been leading the charge and creating all these new persistence choices. These alternatives have, in large part, become more popular due to the rise of Big Data led by companies such as Google, Amazon, Twitter, and Facebook as they have amassed vast amounts of data that must be stored, queried, and analyzed. But more and more companies are collecting massive amounts of data and they need to be able to effectively use all that data to fuel their business. For example social networks all need to be able to analyze large social graphs of people and make recommendations for who to link to next, while almost every large website out there now has a recommendation engine that tries to suggest ever more things you might want to purchase. As these businesses collect more data, they need a way to be able to easily scale-up without needing to re-write entire systems.

Since the 1970s, relational database management systems (RDBMS) have dominated the data landscape. But as businesses collect, store and process more and more data, relational databases are harder and harder to scale. At first you might go from a single server to a master/slave setup, and add caching layers in front of the database to relieve load as more and more reads/writes hit the database. When performance of queries begins to degrade, usually the first thing to be dropped is indexes, followed quickly by denormalization to avoid joins as they become more costly. Later you might start to precompute (or materialize) the most costly queries so that queries then effectively become key lookups and perhaps distribute data in huge tables across multiple database shards. At this point if you step back, many of the key benefits of RDBMSs have been lost — referential integrity, ACID transactions, indexes, and so on. Of course, the scenario just described presumes you become very successful, very fast and need to handle more data with continually increasing data ingestion rates. In other words, you need to be the next Twitter.

Or do you? Maybe you are working on an environment monitoring project that will deploy a network of sensors around the world, and all these sensors will produce huge amounts of data. Or maybe you are working on DNA sequencing. If you know or think you are going to have massive data storage requirements where the number of rows run into the billions and number of columns potentially in the millions, you should consider alternative databases such as HBase. These new databases are designed from the ground-up to scale horizontally across clusters of commodity servers, as opposed to vertical scaling where you try to buy the next larger server (until there are no more bigger ones available anyway).

Enter HBase

HBase is a database that provides real-time, random read and write access to tables meant to store billions of rows and millions of columns. It is designed to run on a cluster of commodity servers and to automatically scale as more servers are added, while retaining the same performance. In addition, it is fault tolerant precisely because data is divided across servers in the cluster and stored in a redundant file system such as the Hadoop Distributed File System (HDFS). When (not if) servers fail, your data is safe, and the data is automatically re-balanced over the remaining servers until replacements are online. HBase is a strongly consistent data store; changes you make are immediately visible to all other clients.

HBase is modeled after Google's Bigtable, which was described in a paper written by Google in 2006 as a "sparse, distributed, persistent multi-dimensional sorted map." So if you are used to relational databases, then HBase will at first seem foreign. While it has the concept of tables, they are not like relational tables, nor does HBase support the typical RDBMS concepts of joins, indexes, ACID transactions, etc. But even though you give those features up, you automatically and transparently gain scalability and fault-tolerance. HBase can be described as a key-value store with automatic data versioning.

You can CRUD (create, read, update, and delete) data just as you would expect. You can also perform scans of HBase table rows, which are always stored in HBase tables in ascending sort order. When you scan through HBase tables, rows are always returned in order by row key. Each row consists of a unique, sorted row key (think primary key in RDBMS terms) and an arbitrary number of columns, each column residing in a column family and having one or more versioned values. Values are simply byte arrays, and it's up to the application to transform these byte arrays as necessary to display and store them. HBase does not attempt to hide this column-oriented data model from developers, and the Java APIs are decidedly more lower-level than other persistence APIs you might have worked with. For example, JPA (Java Persistence API) and even JDBC are much more abstracted than what you find in the HBase APIs. You are working with bare metal when dealing with HBase.

Conclusion to Part 1

In this introductory blog we've learned that HBase is a non-relational, strongly consistent, distributed key-value store with automatic data versioning. It is horizontally scaleable via adding additional servers to a cluster, and provides fault-tolerance so data is not lost when (not if) servers fail. We've also discussed a bit about how data is organized within HBase tables; specifically each row has a unique row key, some number of column families, and an arbitrary number of columns within a family. In the next blog, we'll take first steps with HBase by showing interaction via the HBase shell.

References

Distributed Coordination With ZooKeeper Part 6: Wrapping Up

Posted on July 15, 2013 by Scott Leberknight

This is the sixth (and last) in a series of blogs that introduce Apache ZooKeeper. In the fifth blog, we implemented a distributed lock, dealing with the issues of partial failure due to connection loss and the "herd effect" along the way.

In this final blog in the series you'll learn a few tips for administering and tuning ZooKeeper, and we'll introduce the Curator and Exhibitor frameworks.

Administration and Tuning

As with any complex distributed system, Apache ZooKeeper provides administrators plenty of knobs to control its behavior. Several important properties include the tickTime (the fundamental unit of time in ZooKeeper measured in milliseconds); the initLimit which is the time in ticks to allow followers to connect and sync to the leader; the syncLimit which is the time in ticks to allow a follower to synchronize with the leader; and the dataDir and dataLogDir which are the directories where ZooKeeper stores the in-memory database snapshots and transaction log, respectively.

Next, we'll cover just a few things you will want to be aware of when running a ZooKeeper ensemble in production.

First, when creating a ZooKeeper ensemble you should run each node on a dedicated server, meaning the only thing the server does is run an instance of ZooKeeper. The main reason you want to do this is to avoid any contention with other processes for both network and disk I/O. If you run other I/O and/or CPU-intensive processes on the same machines you are running a ZooKeeper node, you will likely see connection timeouts and other issues due to contention. I've seen this happen in production systems, and as soon as the ZooKeeper nodes were moved to their own dedicated machines, the connection loss problems disappeared.

Second, start with a three node ensemble and monitor the usage of those machines, for example using Ganglia and Nagios, to determine if your ensemble needs additional machines. Remember also to maintain an odd number of machines in the ensemble, so that there can be a majority when nodes commit write operations and when they need to vote for a new leader. Another really useful tool is zktop, which is very similar to the top command on *nix systems. It is a simple, quick and dirty way to easily start monitoring your ensemble.

Third, watch out for session timeouts, and modify the tickTime appropriately, for example maybe you have heavy network traffic and can increase tickTime to 5 seconds.

The above three tips are by no means the end of the story when it comes to administering and tuning ZooKeeper. For more in-depth information on setting up, running, administering and monitoring a ZooKeeper ensemble see the ZooKeeper Administrator's Guide on the ZooKeeper web site. Another resource is Kathleen Ting's Building an Impenetrable ZooKeeper presentation which I attended at Strange Loop 2013, and which provides a lot of very useful tips for running a ZooKeeper ensemble.

Getting a Curator

So far we've seen everything ZooKeeper provides out of the box. But when using ZooKeeper in production, you may quickly find that building recipes like distributed locks and other similar distributed data structures is harder than it looks, because you must be aware of many different kinds of problems that can arise - recall the connection loss and herd effect issues when constructing the distributed lock. You need to know when you can handle exceptions and retry an operation. For example if an idempotent operation fails during a client automatic failover event, you can simply retry the operation. The raw ZooKeeper library does not do much exception handling for you, and you need to implement retry logic yourself.

Helpfully Netflix uses ZooKeeper and has developed a framework named Curator, which they open sourced and later donated to Apache. The Curator wiki page describes it as "a set of Java libraries that make using Apache ZooKeeper much easier". While ZooKeeper comes bundled with the ZooKeeper Java client, using it to develop correct distributed data structures can be difficult and makes the code much harder to understand, due to problems such as connection loss and the "herd effect" which we saw in the previous blog.

Once you have a good understanding of ZooKeeper basics, check out Curator. It provides a client that replaces (wraps) the ZooKeeper class; a framework that contains a high-level API and improved connection and exception handling, along with built-in retry logic in the form of retry policies. Last, it provides a bunch of recipes that implement distributed data structures including locks, barriers, queues, and more. Curator even provides useful testing servers to run a single embedded ZooKeeper server or a test ensemble in unit tests.

Even better, Netflix also created Exhibitor, which is a "supervisor" for your ZooKeeper ensemble. It provides features such as monitoring, backups, a web-based interface for znode exploration, and a RESTful API.

Conclusion

In this series of blogs you were introduced to ZooKeeper; took a test drive in the ZooKeeper shell; worked with ZooKeeper's Java API to build a group membership application as well as a distributed lock; and toured the architecture and implementation details of ZooKeeper. If nothing else, remember that ZooKeeper is like a filesystem, except distributed and replicated. It allows you to build distributed coordination and data structures, is highly available, reliable, and fast due to its leader/follower design with no single point of failure, in-memory reads, and writes via the leader to maintain sequential consistency. Last, it provides clients with (mostly) transparent and automatic session failover in case of server failure. After becoming comfortable with ZooKeeper, be sure to have a look at the Curator framework by Apache (donated by Netflix recently) and also the Exhibitor monitoring application.

References

This is the fifth in a series of blogs that introduce Apache ZooKeeper. In the fourth blog, you saw a high-level view of ZooKeeper's architecture and data consistency guarantees. In this blog, we'll use all the knowledge we've gained thus far to implement a distributed lock.

You've now seen how to interact with Apache ZooKeeper and learned about its architecture and consistency model. Let's now use that knowledge to build a distributed lock. The goals are to build a mutually exclusive lock between processes that could be running on different machines, possibly even on different networks or different data centers. This also has the benefit that clients know nothing about each other; they only know they need to use the lock to access some shared resource, and that they should not access it unless they own the lock.

To build the lock, we'll create a persistent znode that will serve as the parent. Clients wishing to obtain the lock will create sequential, ephemeral child znodes under the parent znode. The lock is owned by the client process whose child znode has the lowest sequence number. In Figure 2, there are three children of the lock-node and child-1 owns the lock at this point in time, since it has the lowest sequence number. After child-1 is removed, the lock is relinquished and then the client who owns child-2 owns the lock, and so on.

Figure 2 - Parent lock znode and child znodes

Distributed Lock Nodes

The algorithm for clients to determine if they own the lock is straightforward, on the surface anyway. A client creates a new sequential ephemeral znode under the parent lock znode. The client then gets the children of the lock node and sets a watch on the lock node. If the child znode that the client created has the lowest sequence number, then the lock is acquired, and it can perform whatever actions are necessary with the resource that the lock is protecting. If the child znode it created does not have the lowest sequence number, then wait for the watch to trigger a watch event, then perform the same logic of getting the children, setting a watch, and checking for lock acquisition via the lowest sequence number. The client continues this process until the lock is acquired.

While this doesn't sound too bad there are a few potential gotchas. First, how would the client know that it successfully created the child znode if there is a partial failure (e.g. due to connection loss) during znode creation? The solution is to embed the client ZooKeeper session IDs in the child znode names, for example child-<sessionId>-; a failed-over client that retains the same session (and thus session ID) can easily determine if the child znode was created by looking for its session ID amongst the child znodes. Second, in our earlier algorithm, every client sets a watch on the parent lock znode. But this has the potential to create a "herd effect" - if every client is watching the parent znode, then every client is notified when any changes are made to the children, regardless of whether a client would be able to own the lock. If there are a small number of clients this probably doesn't matter, but if there are a large number it has the potential for a spike in network traffic. For example, the client owning child-9 need only watch the child immediately preceding it, which is most likely child-8 but could be an earlier child if the 8th child znode somehow died. Then, notifications are sent only to the client that can actually take ownership of the lock.

Fortunately for us, ZooKeeper comes with a lock "recipe" in the contrib modules called WriteLock. WriteLock implements a distributed lock using the above algorithm and takes into account partial failure and the herd effect. It uses an asynchronous callback model via a LockListener instance, whose lockAcquired method is called when the lock is acquired and lockReleased method is called when the lock is released. We can build a synchronous lock class on top of WriteLock by blocking until the lock is acquired. Listing 6 shows how we use a CountDownLatch to block until the lockAcquired method is called. (Sample code for this blog is available on GitHub at https://github.com/sleberknight/zookeeper-samples)

Listing 6 - Creating BlockingWriteLock on top of WriteLock

public class BlockingWriteLock {
  private String path;
  private WriteLock writeLock;
  private CountDownLatch signal = new CountDownLatch(1);

  public BlockingWriteLock(ZooKeeper zookeeper,
          String path, List<ACL> acls) {
    this.path = path;
    this.writeLock =
        new WriteLock(zookeeper, path, acls, new SyncLockListener());
  }

  public void lock() throws InterruptedException, KeeperException {
    writeLock.lock();
    signal.await();
  }

  public void unlock() {
    writeLock.unlock();
  }

  class SyncLockListener implements LockListener {
    @Override public void lockAcquired() {
      signal.countDown();
    }

    @Override public void lockReleased() { /* ignored */ }
  }
}

You can then use the BlockingWriteLock as shown in Listing 7.

Listing 7 - Using BlockingWriteLock

BlockingWriteLock lock =
  new BlockingWriteLock(zooKeeper, path, ZooDefs.Ids.OPEN_ACL_UNSAFE);
try {
  lock.lock();
  // do something while we own the lock
} catch (Exception ex) {
  // handle appropriately
} finally {
  lock.unlock();
}

You can take this a step further, wrapping the try/catch/finally logic and creating a class that takes commands which implement an interface. For example, you can create a DistributedLockOperationExecutor class that implements a withLock method that takes a DistributedLockOperation instance as an argument, as shown in Listing 8.

Listing 8 - Wrapping the BlockingWriteLock try/catch/finally logic

DistributedLockOperationExecutor executor =
  new DistributedLockOperationExecutor(zooKeeper);
executor.withLock(lockPath, ZooDefs.Ids.OPEN_ACL_UNSAFE,
  new DistributedLockOperation() {
    @Override public Object execute() {
      // do something while we have the lock
    }
  });

The nice thing about wrapping try/catch/finally logic in DistributedLockOperationExecutor is that when you call withLock you eliminate boilerplate code and you cannot possibly forget to unlock the lock.

Conclusion to Part 5

In this fifth blog on ZooKeeper, you implemented a distributed lock and saw some of the potential problems that should be avoided such as partial failure on connection loss, and the "herd effect". We took our initial distributed lock and cleaned it up a bit, which resulted in a synchronous implementation using the DistributedLockOperationExecutor and DistributedLockOperation which ensures proper connection handling and lock release.

In the next (and final) blog, we'll briefly touch on administration and tuning ZooKeeper and introduce the Apache Curator framework, and finally summarize what we've learned.

References

This is the fourth in a series of blogs that introduce Apache ZooKeeper. In the third blog, you implemented a group membership example using the ZooKeeper Java API. In this blog, we'll get an overview of ZooKeeper's architecture.

Now that we've test driven Apache ZooKeeper in the shell and Java code, let's take a bird's eye view of the ZooKeeper architecture, and expand on the core concepts discussed earlier. As previously mentioned, ZooKeeper is essentially a distributed, hierarchical filesystem comprised of znodes, which can be either persistent or ephemeral. Persistent znodes can have chidren, whereas ephemeral nodes cannot, and persistent znodes persist after client sessions expire or disconnect. In contrast, ephemeral nodes cannot have children, and they are automatically destroyed as soon as the session in which they were created is closed. Both persistent and ephemeral znodes can have associated data, however the data must be less than 1MB (per znode). All znodes can optionally be sequential, for which ZooKeeper maintains a monotonically increasing number which is automatically appended to the znode name upon creation. Each sequence number is guaranteed to be unique. Finally, all znode operations (reads and writes) are atomic; they either succeed or fail and there is never a partial application of an operation. For example, if a client tries to set data on a znode, the operation will either set the data in its entirely, or no data will be changed at all.

A key element of ZooKeeper's architecture is the ability to set watches on read operations such as exist, getChildren, and getData. Write operations (i.e. create, delete, setData) on znodes trigger any watches previously set on those znodes, and watchers are notified via a WatchedEvent. How clients respond to events is entirely up to them, but setting watches and receiving notifications at some later point in time results in an event-driven, decoupled architecture. Suppose client A sets a watch on a znode. At some point in the future, when client B performs a write operation on the znode client A is watching, a WatchedEvent is generated and client A is called back via the processResult method. Client A and B are completely independent and need not even know anything about each other, so long as they each know their own responsibilities in relation to specific znodes.

Important to remember about watches is that they are one-time notifications about changes to a znode. If a client receives a WatchedEvent notification, it must re-register a new Watcher if it wants to be notified about future updates. During the period between receipt of the notification and re-registration, there exists the possibility that other clients could perform write operations on the znode before the new Watcher is registered which the client would not know about. In other words, it is entirely possible in a high write volume environment that a client can miss updates during the time it takes to process an event and re-register a new watch. Clients should assume updates can be missed, and not rely on having a complete history of every single event that occurs to a given znode.

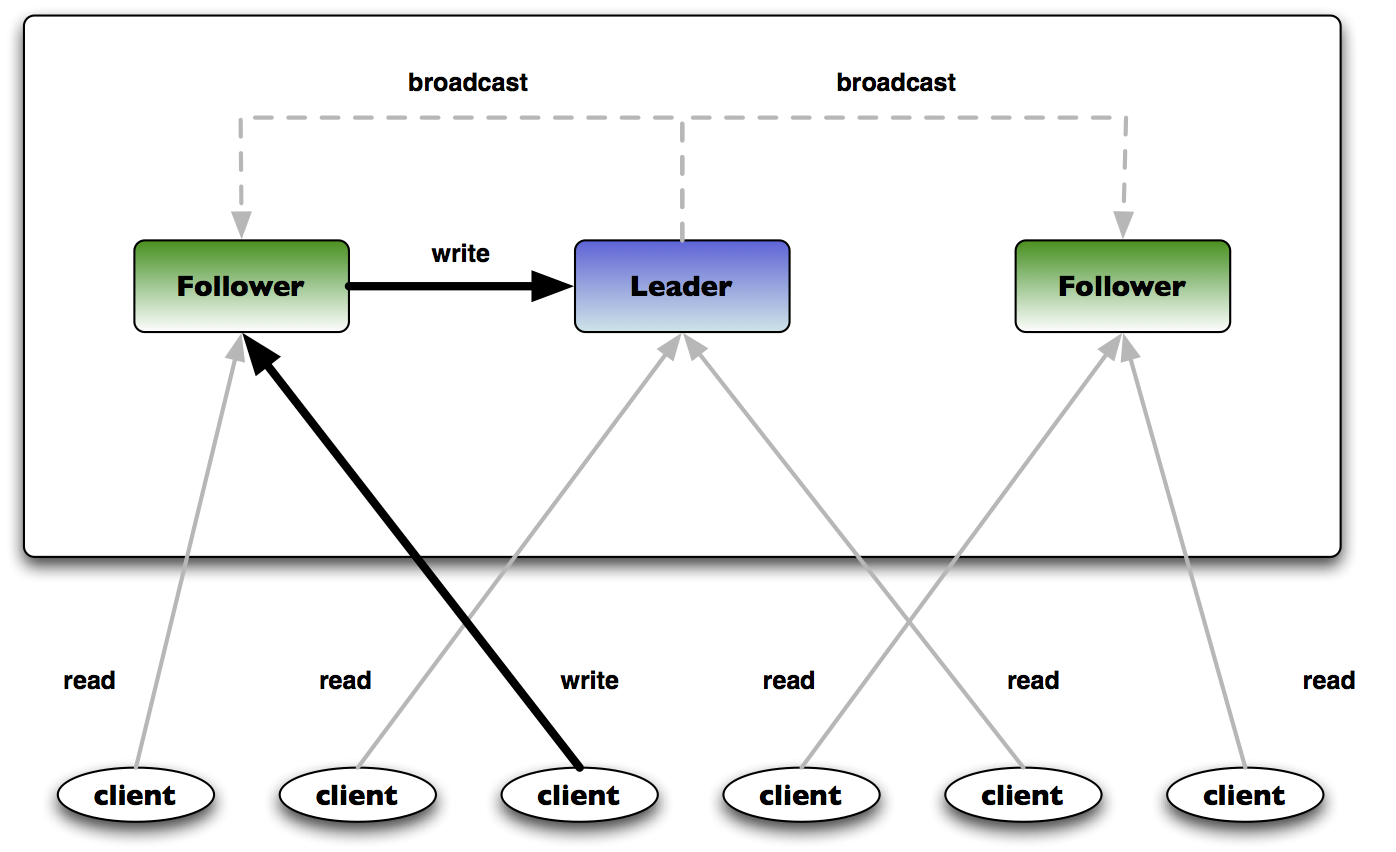
ZooKeeper implements the hierarchical filesystem via an "ensemble" of servers. Figure 1 shows a three server ensemble with multiple clients reading and one client writing. The basic idea is that the filesystem state is replicated on each server in the ensemble, both on disk and in memory.

Figure 1 - ZooKeeper Ensemble

ZooKeeper Architecture

In Figure 1 you can see one of the servers in the ensemble acts as the leader, while the rest are followers. When an ensemble is first started, a leader election is held. During leader election, a leader is elected and the process is complete onces a simple majority of followers have synchronized their state with the leader. After leader election is complete, all write requests are routed through the leader, and changes are broacast to all followers - this is termed atomic broadcast. Once a majority of followers have persisted the change (to disk and memory), the leader commits the change and notifies the client of a successful update. Because only a majority of followers are required for a successful update, followers can lag the leader which means ZooKeeper is an eventually consistent system. Thus, different clients can read information about a given znode and receive a different answer. Every write is assigned a globally unique, sequentially ordered identifier called a zxid, or ZooKeeper transaction id. This guarantees a global order to all updates in a ZooKeeper ensemble. In addition, because all writes go through the leader, write throughput does not scale as more nodes are added.

This leader/follower architecture is not a master/slave setup, however, since the leader is not a single point of failure. If a leader dies, then a new leader election takes place and a new leader is elected (this is typically very fast and will not noticeably degrade performance, however). In addition, because leader election and writes both require a simple majority of servers, ZooKeeper ensembles should contain an odd number of machines; in a five node ensemble any two machines can go down and ZooKeeper can still remain available, whereas a six node ensemble can also only handle two machines going down because if three nodes fail, the remaining three are not a majority (of the original six).

All client read requests are served directly from the memory of the server they are connected to, which makes reads very fast. In addition, clients have no knowledge about the server they are connected to and do not know if they are connected to a leader or follower. Because reads are from the in-memory representation of the filesystem, read throughput increases as servers are added to an ensemble. But recall that write throughput is limited by the leader, so you cannot simply add more and more ZooKeepers forever and expect performance to increase.

Data Consistency

With ZooKeeper's leader/follower architecture in mind, let's consider what guarantees it makes regarding data consistency.

Sequential Updates

ZooKeeper guarantees that updates are made to the filesystem in the order they are received from clients. Since all writes route through the leader, the global order is simply the order in which the leader receives write requests.

Atomicity

All updates either succeed or fail, just like transactions in ACID-compliant relational databases. ZooKeeper, as of version 3.4.0, supports transactions as a thin wrapper around the multi operation, which performs a list of operations (instances of the Op class) and either all operations succeed or none succeed. So if you need to ensure that multiple znodes are updated at the same time, for example if two znodes are part of a graph, then you can use multi or the transaction wrapper around multi.

Consistent client view

Consistent client view means that a client will see the same view of the system, regardless of which server it is connected to. The offical ZooKeeper documentation calls this "single system image". So, if a client fails over to a different server during a session, it will never see an older view of the system than it has previously seen. A server will not accept a connection from a client until it has caught up with the state of the server to which the client was previously connected.

Durability

If an update succeeds, ZooKeeper guarantees it has been persisted and will survive server failures, even if all ZooKeeper ensemble nodes were forcefully killed at the same time! (Admittedly this would be an extreme situation, but the update would survive such an apocalypse.)

Eventual consistency

Because followers may lag the leader, ZooKeeper is an eventually consistent system. But ZooKeeper limits the amount of time a follower can lag the leader, and a follower will take itself offline if it falls too far behind. Clients can force a server to catch up with the leader by calling the asynchronous sync command. Despite the fact that sync is asynchronous, a ZooKeeper server will not process any operations until it has caught up to the leader.

Conclusion to Part 4

In this fourth blog on ZooKeeper you saw a bird's eye view of ZooKeeper's architecture, and learned about its data consistency guarantees. You also learned that ZooKeeper is an eventually consistent system.

In the next blog, we'll dive back into some code and use what we've learned so far to build a distributed lock.

References

This is the third in a series of blogs that introduce Apache ZooKeeper. In the second blog, you took a test drive of ZooKeeper using its command-line shell. In this blog, we'll re-implement the group membership example using the ZooKeeper Java API.

Apache ZooKeeper is implemented in Java, and its native API is also Java. ZooKeeper also provides a C language API, and the distribution provides contrib modules for Perl, Python, and RESTful clients. The ZooKeeper APIs come in two flavors, synchronous or asynchronous. Which one you use depends on the situation. For example you might choose the asynchronous Java API if you are implementing a Java application to process a large number of child znodes independently of one another; in this case you could make good use of the asynchronous API to simultaneously launch all the independent tasks in parallel. On the other hand, if you are implementing simple tasks that perform sequential operations in ZooKeeper, the synchronous API is easier to use and might be a better fit in such cases.

For our group membership example, we'll use the synchronous Java API. The first thing we need to do is connect to ZooKeeper and get an instance of ZooKeeper, which is the main client API through which you perform operations like creating znodes, setting data on znodes, listing znodes, and so on. The ZooKeeper constructor launches a separate thread to connect, and returns immediately. As a result, you need to watch for the SyncConnected event which indicates when the connection has been established. Listing 1 shows code to connect to ZooKeeper, in which we use a CountDownLatch to block until we've received the connected event. (Sample code for this blog is available on GitHub at https://github.com/sleberknight/zookeeper-samples).

Listing 1 - Connecting to ZooKeeper

public ZooKeeper connect(String hosts, int sessionTimeout)
        throws IOException, InterruptedException {
  final CountDownLatch connectedSignal = new CountDownLatch(1);
  ZooKeeper zk = new ZooKeeper(hosts, sessionTimeout, new Watcher() {
    @Override
    public void process(WatchedEvent event) {
      if (event.getState() == Watcher.Event.KeeperState.SyncConnected) {
        connectedSignal.countDown();
      }
    }
  });
  connectedSignal.await();
  return zk;
}

The next thing we need to do is create a znode for the group. As in the test drive, this znode should be persistent, so that it hangs around regardless of whether any clients are connected or not. Listing 2 shows creating a group znode.

Listing 2 - Creating the group znode

public void createGroup(String groupName)
        throws KeeperException, InterruptedException {
  String path = "/" + groupName;
  zk.create(path,
            null /* data */,
            ZooDefs.Ids.OPEN_ACL_UNSAFE,
            CreateMode.PERSISTENT);
}

Note in Listing 2 that we prepended a leading slash to the group name since ZooKeeper requires that all paths be absolute. The create operation takes arguments for the path, a byte[] for data which is optional, a list of ACLs (access control list) to control who can access the znode, and finally the type of znode, in this case persistent. Creating the group member znodes is almost identical to creating the group znode, except we need to create an ephemeral, sequential znode. Let's also say that we need to store some information about each member, so we'll set data on the member znodes. This is shown in Listing 3.

Listing 3 - Creating group member znodes with data

public String joinGroup(String groupName, String memberName, byte[] data)
        throws KeeperException, InterruptedException {
  String path = "/" + groupName + "/" + memberName + "-";
  String createdPath = zk.create(path,
          data,
          ZooDefs.Ids.OPEN_ACL_UNSAFE,
          CreateMode.EPHEMERAL_SEQUENTIAL);
  return createdPath;
}

Now that we can create the group allow members to join the group, it would be nice to have some way to monitor the group membership. To do this we'll first need to list children for the group znode, then set a watch on the group znode, and whenever the watch triggers an event, we'll query ZooKeeper for the group's (updated) members, as shown in Listing 4. This process continues in an infinite loop, hence the class name ListGroupForever.

Listing 4 - Listing a group's members indefinitely

public class ListGroupForever {
  private ZooKeeper zooKeeper;
  private Semaphore semaphore = new Semaphore(1);

  public ListGroupForever(ZooKeeper zooKeeper) {
    this.zooKeeper = zooKeeper;
  }

  public static void main(String[] args) throws Exception {
    ZooKeeper zk = new ConnectionHelper().connect(args[0]);
    new ListGroupForever(zk).listForever(args[1]);
  }

  public void listForever(String groupName)
          throws KeeperException, InterruptedException {
    semaphore.acquire();
    while (true) {
      list(groupName);
      semaphore.acquire();
    }
  }

  private void list(String groupName)
          throws KeeperException, InterruptedException {
    String path = "/" + groupName;
    List<String> children = zooKeeper.getChildren(path, new Watcher() {
      @Override
      public void process(WatchedEvent event) {
        if (event.getType() == Event.EventType.NodeChildrenChanged) {
          semaphore.release();
        }
      }
    });
    if (children.isEmpty()) {
      System.out.printf("No members in group %s\n", groupName);
      return;
    }
    Collections.sort(children);
    System.out.println(children);
    System.out.println("--------------------");
}

The ListGroupForever class in Listing 4 has some interesting characteristics. The listForever method loops infinitely and uses a semaphore to block until changes occur to the group node. The list method calls getChildren to actually retrieve the child nodes from ZooKeeper, and critically sets a Watcher to watch for changes of type NodeChildrenChanged. When the NodeChildrenChanged event occurs, the watcher releases the semaphore, which permits listForever to re-acquire the semaphore and then retrieve and display the updated group znodes. This process continues until ListGroupForever is terminated.

To round out the example, we'll create a method to delete the group. As shown in the test drive, ZooKeeper doesn't permit znodes that have children to be deleted, so we first need to delete all the children, and then delete the group (parent) znode. This is shown in Listing 5.

Listing 5 - Deleting a group

public void delete(String groupName)
        throws KeeperException, InterruptedException {
  String path = "/" + groupName;
  try {
    List<String> children = zk.getChildren(path, false);
    for (String child : children) {
      zk.delete(path + "/" + child, -1);
    }
    zk.delete(path, -1);
  }
  catch (KeeperException.NoNodeException e) {
    System.out.printf("Group %s does not exist\n", groupName);
  }
}

When deleting a group, we passed -1 to the delete method to unconditionally delete the znodes. We could also have passed in a version, so that if we have the correct version number, the znode is deleted but otherwise we receive an optimistic locking violation in the form of a BadVersionException.

Conclusion to Part 3

In this third blog on ZooKeeper, we implemented a group membership example using the Java API. You saw how to connect to ZooKeeper; how to create persistent, ephemeral, and sequential znodes; how to list znodes and set watches to receive events; and finally how to delete znodes.

In the next blog, we'll back off from the code level and get an overview of ZooKeeper's architecture.

References