Several Must Have Firebug-Related Firefox Extensions

Posted on September 28, 2009 by Scott Leberknight

Last week while doing the usual (web development stuff) I discovered a few Firefox extensions I didn't even know I was missing until I found them by accident. The "accident" happened while adding Firebug to a Firefox that was running in a VMWare Fusion Windows virtual machine on which I was testing in, gasp, Windows. I went to find add-ons and searched for Firebug. And up came not only Firebug but also results for Firecookie, Firefinder, Inline Code Finder for Firebug, and CodeBurner for Firebug.

Of course everyone doing web development uses Firebug (or really should anyway) since it rules. But these other extensions provide some really nice functionality and complement Firebug perfectly. Here's a quick run down:

Firecookie

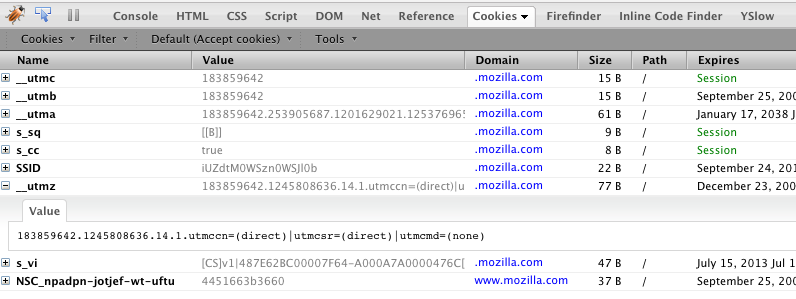
Firecookie lets you see all the cookies for a site, add new ones, remove existing cookies, etc. It gives useful information about each cookie like the name, value, raw value (if URI-encoded), domain, size, path, expiration, and security. Very cool.

Firecookie Firefox Add-On

Firefinder

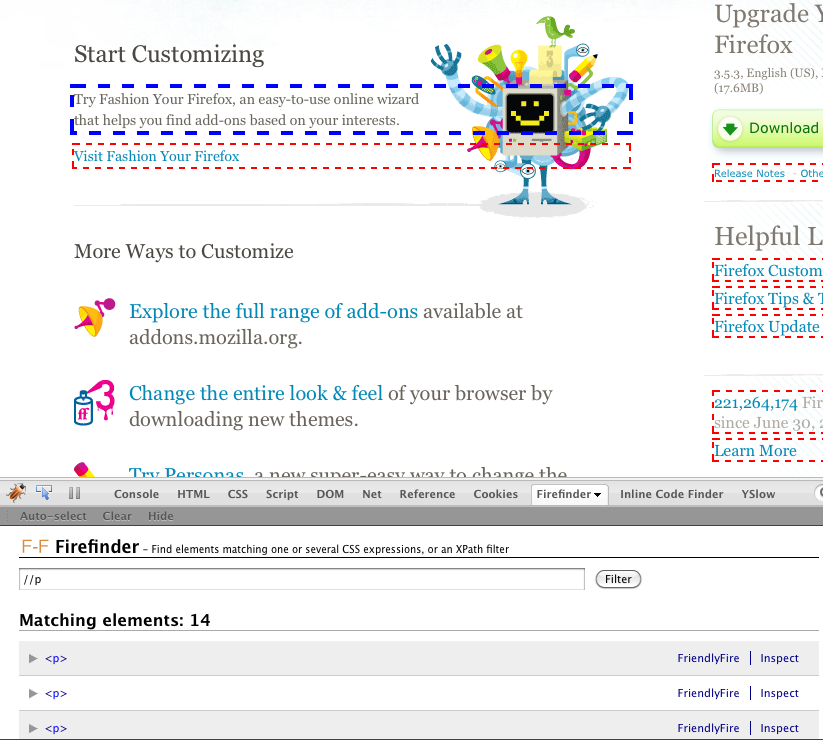
Firefinder for Firebug lets you search for elements on a page using either CSS expressions or an XPath query. In the list of matching elements, you can expand each result, inspect the element by clicking the "Inspect" link, or click "FriendlyFire" which will copy the content you're looking at and post it up to JS Bin. (Be careful with this one if you have code you'd rather not have going up over the wire to a different web site.) Firefinder also puts a dashed border around each matching element it found. As you hover over search results, it highlights the matching element in the page. This is really useful when you want to find all elements matching a CSS expression or when you'd like to use XPath to find specific elements. Nice. Firefinder Firefox Add-On

Inline Code Finder for Firebug

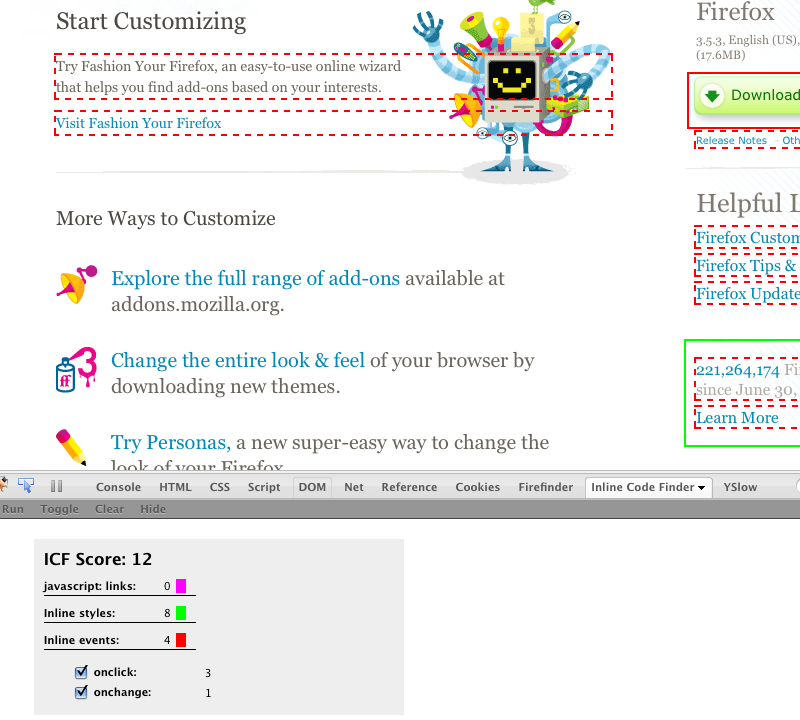
The Inline Code Finder does just that. It finds inline CSS styles, JavaScript links, and inline events, and reports the number of each of these in its results pane. Even better, it highlights each of these problems on the page you are viewing with a thick red border, and as you hover over them it shows you what the problem is in a nicely tooltip. This is really nice to help you become less obtrusive by writing more unobtrusive JavaScript and avoiding inline styles. For older sites or sites that weren't designed with "unobtrusivity" in mind though, be warned that there might be a lot of red on the page!

Inline Code Finder Firefox Add-On

CodeBurner for Firebug

CodeBurner for Firebug provides an inline HTML and CSS reference within Firebug. It allows you to search for HTML elements or CSS styles and shows a definition and an example. It also provides links to the awesome Sitepoint reference and even to the Sitepoint live demos of the feature you are learning about. This is so unbelievably useful to have a HTML and CSS references directly within Firebug it isn't even funny. Thanks Sitepoint.

CodeBurner Firefox Add-On

Migrating Macs When You Use FileVault

Posted on September 21, 2009 by Scott Leberknight

Recently I got a brand spankin new MacBook Pro (MBP) to replace my three-year-old one. One of the things I did not want to deal with is setting up a new computer from scratch and reconfiguring and reinstalling everything I already had on my old MBP. I have things pretty-well organized, I know where things are, and I remember when I rebuilt from scratch from Tiger to Leopard I lost a bunch of settings and such because I hadn't used any kind of migration software. Not this time. This time I wanted my new computer to essentially be my old computer, but with more memory and faster with no hassles.

There are a few options I considered. First, simply take a SuperDuper backup and restore directly to the new MBP. I researched this a lot, talked to people who've done this both successfully and unsuccessfully, and talked to a Genius at the Apple store. The second option was to use the Migration Assistant to transfer from old to new. After all the research, I decided against restoring from SuperDuper for several reasons. First, it seemed to be hit or miss: some people reported success and some did not. Second, and more importantly, I was transferring from a circa August 2006 MBP, in fact one of the first revs that had the Intel chips inside, to a circa June 2009 MBP with the new trackpad and all the other updated jazz. I was mostly concerned that there could have been enough difference between the old and new computers' hardware and software drivers and that a direct restore would not contain up-to-date drivers and whatever else that could screw things up. So I chose to explore using Migration Assistant, which promised a very easy transfer of all files and settings.

So then I ran into the first snag, which is that Migration Assistant does not transfer File Vault-ed user accounts, and I happen to use FileVault. Doh. So I thought, "OK no problem I'll simply turn off FileVault on the old machine first." Except that I only had about 7GB of space left on my hard drive, and turning FileVault off needs about as much free space as your home directory currently takes up. So if my home directory is currently 50GB, then I need about 50GB free. Double Doh, because I didn't have that kind of space! To solve all these problems, here is what I did, for anyone else who might be trying to do the same thing:

Step 1 - Backup Original Mac

Make a SuperDuper backup of the old MBP onto a portable external hard drive. (I actually made two copies on two different external hard drives, just in case something got screwed up later.) The external drive should contain plenty of space, enough so you can turn off FileVault on your home directory.

Step 2 - Turn off FileVault on External Drive

Restart the old Mac and boot from the SuperDuper backup. (You hold down the option key during startup to get the screen where you can choose to boot from the Mac hard drive or the SuperDuper backup on the external drive.) Note at this point you are now running Mac OS X on the external hard drive. Log into the FileVault-ed account, go to System Preferences, and turn FileVault off. (This is why you needed to make sure the external drive has enough space to turn off FileVault, since you are turing it off there, not on your Mac's hard drive!) Now go grab something to eat and/or watch a movie as this step can take a few hours depending on how much data you have.

Once complete, log out and shut down the external drive. You are now ready to transfer.

Step 3 - Prepare for Migration Assistant on New Mac

Log into your new Mac, and connect the external drive that contains the freshly un-FileVault-ed SuperDuper bootable backup of the original Mac. If you or someone else already setup a new user account on the new Mac that has the same username as your old account does, then create a new account with Administrator privileges (e.g. "MigrationAccount") and then delete the account that you will be transferring to. For example, if your old Mac account username was "bsmith" and the new Mac has an account with the same username, remove the "bsmith" account on the new Mac. Otherwise when you attempt the migration you might receive the following message like I did the first time I tried: "There is an existing user account with the same name as an account you are transferring." This wouldn't have been an issue, except that the option to replace the account was disabled and so Migration Assistant was refusing to overwrite it. Thus you should delete it first.

Step 4 - Run Migration Assistant

On the new Mac, run Migration Assistant and answer the questions. You'll be transferring from the external SuperDuper backup to the new Mac. The questions are easy and straightforward. Go grab something to drink or watch some TV, as it'll take a while to transfer all your old files and settings from the external drive to the new Mac. I'll just assume everything went well, because it did for me. If something went wrong, well, I don't have answers other than maybe to try, try, try again from scratch.

Step 5 - Turn FileVault Back On

On the new Mac, turn FileVault on for the newly migrated account, e.g. if the "bsmith" account previously had FileVault on, then login as "bsmith" and turn on FileVault in System Preferences. Tick tock. More waiting as Mac OS X encrypts all the data in your home directory. Once this process completes, your new Mac should be pretty much the same as your old Mac, with all the same files and settings like Desktop, Screen Saver, etc. and with all your applications transferred successfully. And you are back up running with FileVault enabled.

Step 6 - Secure Erase External Hard Drive

At this point you have the new Mac setup with FileVault, and the old Mac still has FileVault on as well since you migrated from the external drive. But, the external drive now has unencrypted data sitting around since you turned FileVault off on it. Open up Disk Utility and do a secure erase of the un-FieVaulted external drive. Depending on which option you choose, e.g. "Zero Out Data", "7-Pass Erase", "35-Pass Erase", etc., the erase process can take a long time, as in days. In other words, a 7- pass write overwrites every part of the disk 7 times to sanitize it and make recovery of the unencrypted information much harder, and takes 7 times longer than just zeroing out the data, which writes zeroes all over data on the disk.

I only did a zero out of the data, because I knew I was going to immediately overwrite that external drive with a new SuperDuper backup once I was done. If you need more insurance than that, a 7-pass erase confirms to the DoD 5220.22-M specification which is probably good enough. (Actually I started out using 7-pass erase until I saw it was going to take a day or two, and then I got a tad lazy and just did the zero out. Perhaps that is bad, but I didn't feel like waiting that long, and it's not like I have data for 100,000 employees on my hard drive in an Excel spreadsheet anyway. Just a lot of code and presentations and such, really.)

Step 7 - Backup New Mac

Make a fresh SuperDuper backup of the new Mac.

Coda

Although all the above sounds like it took a long time, the waiting and time was mostly due to having to turn FileVault off and then on and doing the secure erase. Migration Assistant itself takes a fair amount of time but is totally worth it. Overall the entire process from start to finish on my old MBP with a 100GB hard drive containing only 7GB free space took between five and six hours, which is way less time than if I had tried to start over from scratch with the new Mac. I do wonder why Apple cannot just allow Migration Assistant to transfer accounts with FileVault enabled, because then pretty much all you'd need to do is run Migration Assistant directly, and you wouldn't need to go through all the drama.

Sorting Collections in Hibernate Using SQL in @OrderBy

Posted on September 15, 2009 by Scott Leberknight

When you have collections of associated objects in domain objects, you generally want to specify some kind of default sort order. For example, suppose I have domain objects Timeline and Event:

@Entity
class Timeline {

    @Required 
    String description

    @OneToMany(mappedBy = "timeline")
    @javax.persistence.OrderBy("startYear, endYear")
    Set<Event> events
}

@Entity
class Event {

    @Required
    Integer startYear

    Integer endYear

    @Required
    String description

    @ManyToOne
    Timeline timeline
}

In the above example I've used the standard JPA (Java Persistence API) @OrderBy annotation which allows you to specify the order of a collection of objects via object properties, in this example a @OneToMany association . I'm ordering first by startYear in ascending order and then by endYear, also in ascending order. This is all well and good, but note that I've specified that only the start year is required. (The @Required annotation is a custom Hibernate Validator annotation which does exactly what you would expect.) How are the events ordered when you have several events that start in the same year but some of them have no end year? The answer is that it depends on how your database sorts null values by default. Under Oracle 10g nulls will come last. For example if two events both start in 2001 and one of them has no end year, here is how they are ordered:

2001 2002  Some event
2001 2003  Other event
2001       Event with no end year

What if you want to control how null values are ordered so they come first rather than last? In Hibernate there are several ways you could do this. First, you could use the Hibernate-specific @Sort annotation to perform in-memory (i.e. not in the database) sorting, using natural sorting or sorting using a Comparator you supply. For example, assume I have an EventComparator helper class that implements Comparator. I could change Timeline's collection of events to look like this:

@OneToMany(mappedBy = "timeline")
@org.hibernate.annotations.Sort(type = SortType.COMPARATOR, comparator = EventCompator)
 Set<Event> events

Using @Sort will perform sorting in-memory once the collection has been retrieved from the database. While you can certainly do this and implement arbitrarily complex sorting logic, it's probably better to sort in the database when you can. So we now need to turn to Hibernate's @OrderBy annotation, which lets you specify a SQL fragment describing how to perform the sort. For example, you can change the events mapping to :

@OneToMany(mappedBy = "timeline")
@org.hibernate.annotations.OrderBy("start_year, end_year")
 Set<Event> events

This sort order is the same as using the JPA @OrderBy with "startYear, endYear" sort order. But since you write actual SQL in Hibernate's @OrderBy you can take advantage of whatever features your database has, at the possible expense of portability across databases. As an example, Oracle 10g supports using a syntax like "order by start_year, end_year nulls first" to order null end years before non-null end years. You could also say "order by start_year, end year nulls last" which sorts null end years last as you would expect. This syntax is probably not portable, so another trick you can use is the NVL function, which is supported in a bunch of databases. You can rewrite Timeline's collection of events like so:

@OneToMany(mappedBy = "timeline")
@org.hibernate.annotations.OrderBy("start_year, nvl(end_year , start_year)")
 Set<Event> events

The expression "nvl(end_year , start_year)" simply says to use end_year as the sort value if it is not null, and start_year if it is null. So for sorting purposes you end up treating end_year as the same as the start_year if end_year is null. In the contrived example earlier, applying the nvl-based sort using Hibernate's @OrderBy to specify SQL sorting criteria, you now end with the events sorted like this:

2001       Event with no end year
2001 2002  Some event
2001 2003  Other event

Which is what you wanted in the first place. So if you need more complex sorting logic than what you can get out of the standard JPA @javax.persistence.OrderBy, try one of the Hibernate sorting options, either @org.hibernate.annotations.Sort or @org.hibernate.annotations.OrderBy. Adding a SQL fragment into your domain class isn't necessarily the most elegant thing in the world, but it might be the most pragmatic thing.

Groovification

Posted on May 04, 2009 by Scott Leberknight

Last week I tweeted about groovification, which is defined thusly:

groovification. noun. the process of converting java source code into groovy source code (usually done to make development more fun)

On my main day-to-day project, we've been writing unit tests in Groovy for quite a while now, and recently we decided to start implementing new code in Groovy rather than Java. The reason for doing this is to gain more flexibility in development, to make testing easier (i.e. in terms of the ability to mock dependencies in a trivial fashion), to eliminate a lot of Java boilerplate code and thus write less code, and of course to make developing more fun. It's not that I hate Java so much as I feel Java simply isn't innovating anymore and hasn't for a while, and isn't adding features that I simply don't want to live without anymore such as closures and the ability to do metaprogramming when I need to. In addition, it isn't removing features that I don't want, such as checked exceptions. If I know, for a fact, that I can handle an exception, I'll handle it appropriately. Otherwise, when there's nothing I can do anyway, I want to let the damn thing propagate up and just show a generic error message to the user, log the error, and send the admin team an email with the problem details.

This being, for better or worse, a Maven project, we've had some interesting issues with mixed compilation of Java and Groovy code. The GMaven plugin is easy to install and works well but currently has some outstanding issues related to Groovy stub generation, specifically it cannot handle generics or enums properly right now. (Maybe someone will be less lazy than me and help them fix it instead of complaining about it.) Since many of our classes use generics, e.g. in service classes that return domain objects, we currently are not generating stubs. We'll convert existing classes and any other necessary dependencies to Groovy as we make updates to Java classes, and we are implementing new code in Groovy. Especially in the web controller code, this becomes trivial since the controllers generally depend on other Java and/or Groovy code, but no other classes depend on the controllers. So starting in the web tier seems to be a good choice. Groovy combined with implementing controllers using the Spring @MVC annotation-based controller configuration style (i.e. no XML configuration), is making the controllers really thin, lightweight, and easy to read, implement, and test.

I estimate it will take a while to fully convert all the existing Java code to Groovy code. The point here is that we are doing it piecemeal rather than trying to do it all at once. Also, whenever we convert a Java file to a Groovy one, there are a few basics to make the classes Groovier without going totally overboard and spending loads of time. First, once you've used IntelliJ's move refactoring to move the .java file to the Groovy source tree (since we have src/main/java and src/main/groovy) you can then use IntelliJ's handy-dandy "Rename to Groovy" refactoring. In IntelliJ 8.1 you need to use the "Search - Find Action" menu option or keystroke and type "Rename to..." and select "Rename to Groovy" since they goofed in version 8 and that option was left off a menu somehow. Once that's done you can do a few simple things to make the class a bit more groovy. First, get rid of all the semi-colons. Next, replace getter/setter code with direct property access. Third, replace for loops with "each"-style internal iterators when you don't need the loop index and "eachWithIndex" where you do. You can also get rid of some of the redundant modifiers like "public class" since that is the Groovy default. That's not too much at once, doesn't take long, and makes your code Groovier. Over time you can do more groovification if you like.

The most common gotchas I've found have to do with code that uses anonymous or inner classes since Groovy doesn't support those Java language features. In that case you can either make a non-public named class (and it's OK to put it in the same Groovy file unlike Java as long as it's not public) or you can refactor the code some other way (using your creativity and expertise since we are not monkeys, right?). This can sometimes be a pain, especially if you are using a lot of them. So it goes. (And yes, that is a Slaughterhouse Five reference.)

Happy groovification!

Thinking Matters

Posted on April 30, 2009 by Scott Leberknight

Aside from the fact that Oracle's Java Problem contains all kinds of factual and other errors (see the comments on the post) this sentence caught my eye in particular when referring to Java being "quite hard to work with" - "Then, as now, you needed to be a highly trained programmer to make heads or tails of the language."

What's the issue here? That Java is hard to work with? Perhaps more specifically, not just Java but perhaps the artificial complexity in developing "Enterprise" applications in Java? Nope. The problem is that this type of thinking epitomizes the attitude that business people and other "professionals" tend to have about software development in general, in that they believe it is or should be easy and that it is always the tools and rogue programmers that are the problem. Thus, with more and better tools, they reason, there won't be a need for skilled developers and the monkey-work of actually programming could be done by, well, monkeys.

I believe software development is one of the hardest activities humans currently do, and yes I suppose I do have some bias since I am a developer. Also contrary to what many people think, there is both art and engineering involved, and any given problem can be solved in an almost infinite variety of ways. Unlike more established disciplines that have literally been around for hundreds or thousands of years (law, medicine, accounting, architecture, certain branches of engineering like civil, etc.), the software industry hasn't even reached the century mark yet! As a result there isn't any kind of consensus whatsoever about a completely standardized "body of knowledge" and thus there isn't an industy-recognized set of standard exams and boards like you find in the medical and law professions for example. (That topic is for a future post.)

One thing that is certain is that software development involves logic, and thus people who can solve problems using logic will always be needed, whether the primary medium stays in textual format (source code) or whether it evolves into some different representation like Intentional Software is trying to do. So the statement from the article that "you needed to be a highly trained programmer to make heads or tails of the language" is always going to be true in software development. More generally, highly skilled people are needed in any complex endeavor, and attempts to dumb dumb complex things will likely not succeed in any area, not just software development. Would you trust someone to perform surgery on you so long as they have a "Dummies Guide to Surgery" book? Or someone to represent you in court who stayed at a Holiday Inn Express last night?

I hypothesize that things are becoming more complex as time moves on, not less. I also propose that unless we actually succeed in building Cylons who end up wiping us all out or enslaving us, we will never reach a point where we don't need people to actually think and use logic to solve problems. So even though many business-types would love to be able to hire a bunch of monkeys and pay them $0.01 per day to develop software, those who actually realize that highly skilled people are an asset and help their bottom line, and treat them as such, are the ones who will come out on top, because they will smash their competitors who think of software/IT purely as a cost center and not a profit center.

Running VisualVM on a 32-bit Macbook Pro

Posted on April 01, 2009 by Scott Leberknight

If you want/need to run VisualVM on a 32-bit Macbook Pro you'll need to do a couple of things. First, download and install Soy Latte, using these instructions - this gets you a Java 6 JDK/JRE on your 32-bit Macbook Pro. Second, download VisualVM and extract it wherever, e.g. /usr/local/visualvm. If you now try to run VisualVM you'll get the following error message:

$ ./visualvm
./..//platform9/lib/nbexec: line 489: /System/Library/Frameworks/JavaVM.framework/
Versions/1.6/Home/bin/java: Bad CPU type in executable

Oops. After looking at the bin/visualvm script I noticed it is looking for an environment variable named "jdkhome." So the third step is to export an environment variable named 'jdkhome' that points to wherever you installed Soy Latte:

export jdkhome=/usr/local/soylatte16-i386-1.0.3

Now run the bin/visualvm script from the command line. Oh, almost forgot to mention that you should also have X11 installed, which it will be by default on Mac OS X Leopard. Now if all went well, you should have VisualVM up and running!

Missing aop 'target' packages in Spring 3.0.0.M1 zip file

Posted on January 15, 2009 by Scott Leberknight

Today I was mucking around with the Spring 3.0.0.M1 source release I downloaded as a ZIP file. I wanted to simply get the sample PetClinic up and running and be able to load Spring as a project in IntelliJ. Note Spring now requires Java 6 to build, so if you're using an older 32-bit Macbook Pro you'll need to install JDK 6. I used these instructions generously provided by Landon Fuller to install Soy Latte, which is a Java 6 port for Mac OS X (Tiger and Leopard). So I went to run the "ant jar package" command (after first setting up Ivy since that is how Spring now manages dependencies) and everything went well until I got a compilation exception. There unfortunately wasn't any nice error message about why the compile failed.

So next I loaded up the Spring project in IntelliJ and tried to compile from there. Aha! It tells me that the org.springframework.aop.target package is missing as well as the org.springframework.aop.framework.autoproxy.target package, and of course all the classes in those packages were also missing. I was fairly sure I didn't accidentally delete those two packages in the source code, so I checked the spring-framework-3.0.0.M1.zip file to be sure. Sure enough those two 'target' packages are not present in the source code in the zip file. The resolution is to go grab the missing files from the Spring 3.0.0.M1 subversion repository and put them in the correct place in the source tree. The better resolution is to do an export of the 3.0.0.M1 tag from the Subversion repo directly, rather than be lazy like I was and download the zip file.

I still am wondering why the 'target' packages were missing, however. My guess is that whatever build process builds the zip file for distribution excluded directories named 'target' since 'target' is a common output directory name in build systems like Ant and Maven and usually should be excluded since it contains generated artifacts. If that assumption is correct and all directories named 'target' were excluded, then unfortunately the two aop subpackages named 'target' got mistakenly excluded which caused a bit of head-scratching as to why Spring wouldn't compile.

Groovy + Spring = Groovier Spring

Posted on January 06, 2009 by Scott Leberknight

If you're into Groovy and Spring, check out my two-part series on IBM developerWorks on using Groovy together with Spring's dynamic language support for potentially more flexible (and interesting) applications. In Part 1 I show how to easily integrate Groovy scripts (i.e. .groovy files containing one or more classes) into Spring-based applications. In Part 2 I show how to use the "refreshable beans" feature in Spring to automatically and transparently reload Spring beans implemented in Groovy from pretty much anywhere including a relational database, and why you might actually are to do something like that!

iPhone Bootcamp Summary

Posted on December 05, 2008 by Scott Leberknight

So, after having actually written a blog entry covering each day of the iPhone bootcamp at Big Nerd Ranch, I thought a more broad summary would be in order. (That, and I'm sitting in the airport waiting for my flight this evening.) Anyway, the iPhone bootcamp was my second BNR class (I took the Cocoa bootcamp last April and wrote a summary blog about it here.)

As with the Cocoa bootcamp, I had a great time and learned a ton about iPhone development. I met a lot of really cool and interesting people with a wide range of backgrounds and experiences. This seems to be a trend at BNR, that the people who attend are people who have a variety of knowledge and experience, and bring totally different perspectives to the class. The students who attend are also highly motivated people in general, which, when combined with excellent instruction and great lab coding exercises all week, makes for a great learning environment.

Another interesting thing that happens at BNR is that in this environment, you somehow don't burn out and can basically write code all day every day and many people keep at it into the night hours. I think this is due to the way the BNR classes combine short, targeted lecture with lots and lots and lots of hands-on coding. In addition, taking an afternoon hike through untouched nature really helps to refresh you and keep energy levels up. (Maybe if more companies, and the USA for that matter, encouraged this kind of thing people would actually be more productive rather than less.) And because of the diversity of the students, every meal combines good food with interesting conversation.

So, thanks to our instructors Joe and Brian for a great week of learning and to all the students for making it a great experience. Can't wait to take the OpenGL bootcamp sometime in the future.

iPhone Bootcamp Day 5

Posted on December 05, 2008 by Scott Leberknight

Today is Day 5 — the final day — of the iPhone bootcamp at Big Nerd Ranch, taught by Joe Conway. The last day of Big Nerd Ranch bootcamps are half-days so you have breakfast, have class until lunch, have lunch, and then shuttle back to the airport. Unfortunately for me my flight isn't until 7pm so I have a lot of time to write this entry!

See here for a list of each day's blog entries.

Preferences

First up on this last day of iPhone bootcamp is preferences, which allow an app to keep user settings in a centralized location. While you can store user settings yourself using a custom UI, the easiest way is to use the iPhone's built-in Settings app. The Settings app is the central location where apps can store user settings. It is also where all the other common iPhone settings are, which is convenient.

You work with the NSUserDefaults object to store app settings based on the app's bundle ID, for example com.acme.MyKillerApp. You'll also want to ensure you provide "factory default" settings using the registerDefaults method; these settings will be used if the user has not changed anything. NSUserDefaults is basically a dictionary of key-value pairs, and you obtain the standard user defaults using the standardUserDefaults method. From that point you can write user settings using methods like setObject:forKey, setInteger:forKey, and so on, and you can remove settings using removeObjectForKey. Similarly, you read settings using methods like objectForKey, integerForKey, and so forth.

As mentioned earlier, the Settings app is a uniform way of setting preferences for all apps. Users know where to look for setting preferences for apps there. In addition, managing the settings separately from your application also saves screen real estate, which is important since the screen isn't all that big. You define the settings for your application using the Settings Bundle. This is a standard Property List. You use special property keys, such as PSToggleSwitchSpecifier, to define the settings for your application. The Settings app uses the Settings bundle and property list to create the settings UI for your app. For example, if you define settings for a PSToggleSwitchSpecifier, a PSTextFieldSpecifier, and a PSMultiValueSpecifier, the user will see a toggle switch, a text field, and a slider when she goes to edit your app's settings.

For the lab exercise, we modified our Random Number app (from Day 4 during the Web Services section) to have user settings for how the random numbers are generated — for example minimum number and the range of numbers. It is quite easy to add user settings to your app in the iPhone using the Settings app and bundle.

Instruments

Joe briefly talked about using the Instruments app to do powerful debugging, for example to detect memory leaks in your app. He then demonstrated using the Leaks tool within Instruments to track a memory leak — which he had previously introduced intentionally — in the Tile Game app. Leaks was able to pinpoint the exact line of code where a leaked object (i.e. it was not released) was allocated. This is pretty cool.

Joe also showed what leaks look like when they come from C code versus Objective-C code. C-code allocation leaks (i.e. allocated using malloc) show up in Instruments as just 'General Block' and from what I gather are probably not that fun to track down the exact cause. Leaks in Objective-C code are easier, and as I just mentioned, Leaks can show you the exact line of code where a leaked object was allocated.

Networking

By this time, it is getting closer to lunch, and the end of the class. Sad, I know. Anyway, probably one of the hardest and broadest topics was saved for last, given that you could spend an entire course on nothing but network programming. Anyway, on the iPhone a key concept when doing network programming is "reachability." Reachability does not mean that a network resource is definitely available; rather it means the resource is "not impossible" to reach. Another important thing on the iPhone is figuring out what type of connection you have, for example EDGE or 3G or Wi-Fi. You might choose to do different things based on the type of connection.

With the SystemConfiguration framework you can determine if the outside world is reachable, again with the caveat the "reachable" means "not impossible to reach." When coding you work with "reachability references" and "reachability flags" which describe the type of connection, for example reachable, connection required, is wide-area network, and so on.

We then learned a bit about Bonjour, which is basically a zero-configuration network service discovery mechanism that works on all platforms, has implementations in many languages, and is easy to use. For example, Bonjour makes it ridiculously easy to find printers on a network, as opposed to the way you have to do it in other operating systems. You can use Bonjour on the iPhone to discover and resolve Bonjour services. You use NSNetServices and NSNetServiceBrowser to accomplish this, and you specify a delegate to receive notifications when services appear and disappear.

In addition to Bonjour, you can also send and receive data over the network as you would expect. To send and receive data you can either use a C-based Core Foundation interface or use a stream-based interface with CFStream. You register read and write callbacks with the main iPhone run loop, which calls your functions when network events occur.

Network programming is really hard, since there are so many things that can go wrong and you need to deal with many if not all of them. Joe recommended that before jumping right into hardcore networking, developers should become familiar with the concepts and recommended the Beej's guide to network programming as a good primer. Given that I've really only done simple socket programming in higher-level APIs like Java's, and have not really done much of it, I'll need to check that out. And so this concludes this episode of iPhone bootcamp blog, since it is now time for lunch and, sadly, the course is over!

Random Thoughts

This week has been a really intensive introduction to iPhone programming. We've gone from a very simple app on Day 1 and covered all kinds of things like form-based UIs and text manipulation; Core Location; Core Graphics; view transitions and Core Animation; using the iPhone camera and accelerometer; retrieving web-based data; manipulating Address Book data; setting user preferences, and finally networking and debugging using Instruments. We've basically covered an entire book's worth of content and written about 10 iPhone applications ranging from simple to not-so-simple. If you are interested in programming the iPhone, I definitely recommend checking out the iPhone bootcamp at Big Nerd Ranch. Because the OpenGL stuff we did on the iPhone was so cool, I'm thinking my next course to take might be the OpenGL bootcamp but that probably won't happen until next year sometime! With my new knowledge I plan to go home and try my hand at creating a snowflake or snowstorm application that my daughters can play with. If I actually get it working maybe I'll write something about it.