Java Versus Ruby/Rails Books Revisited...It Was Only A Matter Of Time

Posted on March 18, 2008 by Scott Leberknight

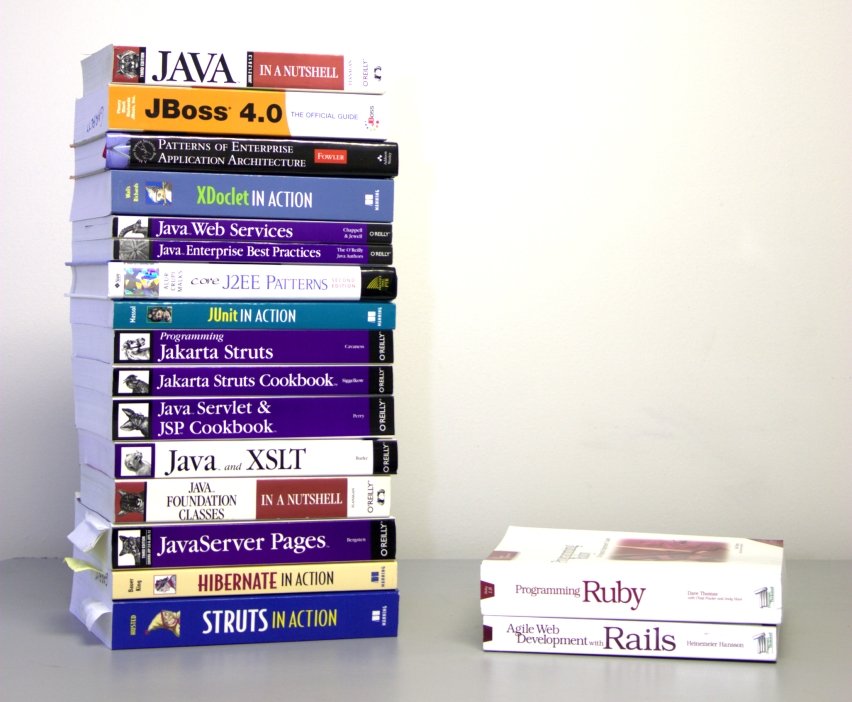
Remember when the big joke was to compare the book stacks of a typical Java web developer with that of a Ruby/Rails developer?

Java Versus Ruby Book Stacks

I suppose it was only a matter of time, because now maybe the Ruby/Rails stack looks more like this:

Ruby and Rails Books circa 2008

By the way, I like and use Ruby/Rails and use Java among other languages like Python and Groovy so I am not comparing the actual technologies, just the available reading material. The real trend is that since the original Java vs. Ruby books stack images first appeared, Ruby/Rails have gained a lot of traction and people are naturally writing a lot more material to satisfy the demand. I should also note that shawn believes that you still only need the original two Pragmatic Programmer books Programming Ruby and Agile Web Development with Rails. Regardless, there are a lot more options available now and I've heard people say books like The Ruby Way and Rails Recipes are very good books as well. Ah the paradox of choice.

Image credits: Antonio Cangiano for the Ruby/Rails recommended books image, and garbett.org for the Java vs. Ruby book stack image.

SecurityException Running Groovy Scripts with JetGroovy IntelliJ Plugin

Posted on February 20, 2008 by Scott Leberknight

Yesterday before leaving for home I happily upgraded the JetGroovy plugin to the latest and greatest version 1.0.14394 (on Mac OS X Leopard). Up until now, I've had great luck with this plug-in and have enjoyed using it to write Groovy code. Today, however, when I went to run several Groovy scripts I've been using while preparing a presentation, they failed with a rather nasty error:

java.lang.SecurityException: Prohibited package name: java.lang
...
...
...lots more stack trace gunk...

Uh oh. After doing some investigation on the JetBrains forums, the problem is that the JDK classes are being set in the Groovy classpath that IntelliJ passes to groovyStarter, which causes the security exception, presumably because Java thinks something is trying to add java.lang classes to the classpath. The issue is GRVY-1088 in JetBrains' JIRA tracker in case you are interested.

Fortunately a co-worker had not yet upgraded to the latest version and that version still works fine. In fact, that older version 1.0.14201 actually does not call groovyStarter but instead uses groovy.lang.GroovyShell to execute the script. So somewhere along the way the way JetGroovy runs Groovy scripts was completely changed to use groovyStarter but incorrectly passes all the JDK classes to it, causing the SecurityException. It actually works fine if you remove all the JDK classes from the classpath and run the command.

So the solution that has worked for me today is to downgrade to version 1.0.14201. You can find that version here. Just unzip it and replace the existing plug-in at ~/Library/Application Support/IntelliJIDEA70/Groovy and then you should be able to run Groovy scripts again from within IntelliJ. Of course this also means you cannot upgrade the plugin until GRVY-1088 is fixed.

Groovier Spring at the Groovy/Grails Experience

Posted on February 14, 2008 by Scott Leberknight

I am not very good at the self-promotion thing, mainly because there are so many other people out there way, way smarter than I am. But in this case I'll make a small exception and mention that I'll be speaking next weekend at the Groovy/Grails Experience in Reston, VA giving a presentation called "Groovier Spring" in which I'll try to show how Groovy can make Spring-based applications more dynamic and flexible. Spring solves a bunch of underlying issues with the Java EE platform, for example dependency injection, resource and transaction management using AOP, and allowing applications to be tested more thoroughly and easily.

There is also a podcast on aboutGroovy in which I talk (or blather on, or ramble, or something like that) with Scott Davis about using Groovy together with Spring and talk about my talk, if that makes sense. You can hear it here on aboutGroovy.

This is the fifth in a series of short blogs describing how the Hibernate Validator allows you to define validation rules directly on domain objects. In the fourth article I explained why I don't use several of the standard Hibernate validators. In this article I'll show how to bypass Hibernate validation and when that makes sense.

As indicated by the title of this article, the primary use case I've seen for bypassing standard validation on an object is to allow saving objects in a draft state. For example, suppose you have a lengthy form that a user can fill out, such as a mortgage application or insurance claim, and you want to allow users to save their work as a draft and be able to come back and complete at a later time. In this case, you probably don't want to apply all the validation rules, since it is almost a given that if they haven't finished filling in the form, that it won't pass the validation rules. In this use case bypassing Hibernate validation makes perfect sense. By the way, I am not going to get into the argument of whether storing draft data means that the database must have relaxed constraints, and whether this is good or bad. If you don't relax the database constraints (e.g. allow null values in columns that should be required), then where do you store the draft data? Probably in a separate table that looks almost identical to the "real" table except with all the constraints relaxed (e.g. you might have a loan_applications table as well as a draft_loan_applications table). Assuming, like me, that you don't like that solution and would prefer to save draft objects in the same database table as non-draft objects, read on.

In order to allow the Hibernate event-based validation to be bypassed, you need to create your own validation event listener and provide a way to disable validation temporarily. Since the actual validation logic doesn't change, and the only extra logic we need is to allow clients to turn validation off and then back on, we can extend Hibernate's ValidateEventListener. The following class is all you need (some lengthy JavaDocs have been omitted for brevity):

package com.nearinfinity.common.hibernate.validator.event;

import org.hibernate.event.PreInsertEvent;
import org.hibernate.event.PreUpdateEvent;
import org.hibernate.validator.event.ValidateEventListener;

/**
 * Extension of Hibernate's <code>ValidateEventListener</code> that allows you to bypass the normal validation performed
 * by Hibernate for a specific thread.
 *
 * @author Andrew Avenoso
 * @author Scott Leberknight
 */
public class OptionalValidateEventListener extends ValidateEventListener {

    private static ThreadLocal<Boolean> shouldValidateThreadLocal = new ThreadLocal<Boolean>() {
        @Override
        protected Boolean initialValue() {
            return Boolean.TRUE;
        }
    };

    /**
     * Perform validation before insert, <code>unless</code> {@link #turnValidationOff()} has been called for the
     * currently executing thread.
     *
     * @param event the PreInsertEvent
     * @return Return true if the operation should be vetoed
     */
    @Override
    public boolean onPreInsert(PreInsertEvent event) {
        return isCurrentlyValidating() && super.onPreInsert(event);
    }

    /**
     * Perform validation before update, <code>unless</code> {@link #turnValidationOff()} has been called for the
     * currently executing thread.
     *
     * @param event the PreUpdateEvent
     * @return Return true if the operation should be vetoed
     */
    @Override
    public boolean onPreUpdate(PreUpdateEvent event) {
        return isCurrentlyValidating() && super.onPreUpdate(event);
    }

    /** Call this method to explicitly turn validation on for the currently executing thread. */
    public static void turnValidationOn() {
        OptionalValidateEventListener.shouldValidateThreadLocal.set(Boolean.TRUE);
    }

    /** Call this method to bypass validation for the currently executing thread. */
    public static void turnValidationOff() {
        OptionalValidateEventListener.shouldValidateThreadLocal.set(Boolean.FALSE);
    }

    /** @return <code>true</code> if we need to validate for the current thread */
    public static Boolean isCurrentlyValidating() {
        return OptionalValidateEventListener.shouldValidateThreadLocal.get();
    }
}

The most important things about the above class are:

  • Validation is turned on/off on a per-thread basis using a ThreadLocal variable.
  • If validation is turned off for a specific thread by a client, the client should ensure validation is turned back on after performing persistence operations.

The reason this class uses a ThreadLocal to determine whether to perform validation is because it assumes usage in a multi-threaded environment; for example, you would definitely not want turn turn off validation for all threads in a web application serving lots of concurrent users even for a very short duration! In addition, the reason it is important for clients to reset the validation state for a thread is because the thread might be reused for subsequent client requests, as in many application servers in a JEE environment which pool and reuse threads. (Thanks to Jeff Kunkle for pointing this out.)

The other important thing here has nothing to do with the above code and is instead a configuration issue. If you read my second article in this series you know that Hibernate auto-registers the default ValidateEventListener if it is present in the CLASSPATH, which it will be when you have the Hibernate Validator JAR in your project. So you will need to do two things (refer back to the second article for the configuration details):

  1. Configure the OptionalValidateEventListener for "pre-insert" and "pre-update" events.
  2. Disable automatic registration of the Hibernate ValidateEventListener by setting the hibernate.validator.autoregister_listeners property to "false."

Once that's done you only need to figure out where you need to bypass validation and use code like the following, which is taken from one of our base Spring MVC web controller classes in my current project:

 if (shouldPerformHibernateValidation()) {
     return onSubmitInternal(request, response, command, errors);
 }
 else {
     OptionalValidateEventListener.turnValidationOff();
     try {
         // The following method call would run without any Hibernate validation! 
         return onSubmitInternal(request, response, command, errors);
     }
     finally {
         OptionalValidateEventListener.turnValidationOn();
     }
 }

In the above, the most important thing is that we use a finally block to ensure validation is turned back on regardless of what happened inside the onSubmitInternal() method. We essentially hid this code in a "framework" class so that it is not littered in all the places where we need to bypass validation. The implementation of shouldPerformHibernateValidation() method could be implemented any number of ways, but the point is that you need some way to decide to perform validation or bypass it. Once that decision is made it is easy to turn validation off, execute the code where the bypass occurs, and finally (pun intended) turn validation back on.

In the next and final article in this series, I'll describe how the Hibernate Validator can be integrated into web applications so that validation errors propagate seamlessly from the data access code back up through the web tier and to the end user as nicely formatted error messages.

Validating Domain Objects in Hibernate Part 4: @NotNull and @NotEmpty

Posted on October 05, 2007 by Scott Leberknight

This is the fourth in a series of short blogs describing how the Hibernate Validator allows you to define validation rules directly on domain objects where it belongs. In the third article I showed how to create your own validators. In this article I'll explain the statement I made in the last article that I don't use the @NotNull and @NotEmpty validations in practice, even though at first glance they would seem to be some very useful validators.

First the @NotEmpty validator. Actually this annotation is fine assuming you want to validate "that a String is not empty (not null and length > 0) or that a Collection (or array) is not empty (not null and length > 0)." That is the description in the JavaDoc for the @NotEmpty validator. My only problem with this is that @NotEmpty only applies to strings and collections or arrays. There are lots of times when you want to ensure that dates, numbers, or custom types are required, and @NotEmpty can't help you out. That's pretty much why I don't use it.

Now on to the @NotNull validation annotation. There is a major problem with this validator, which is that it simply doesn't behave the way other validators behave. If you try to save an object having a property annotated with @NotNull, and that property's value is actually null, you would expect to receive an InvalidStateException, which is what happens with other validators. What you actually receive is a PropertyValueException which is the result of Hibernate enforcing a nullability check on the property annotated with @NotNull. I have gone through what happens line-by-line in a debugger and, other than the fact that it is extremely complicated, eventually you arrive at the checkNullability() method in the Nullability class which checks "nullability of the class persister properties" according to the JavaDocs and throws a PropertyValueException with the message "not-null property references a null or transient value." This behavior happens even if the actual column in the database allows nulls!

For example, I have a simple User entity with an active property annotated with @NotNull defined as follows:

 @Type(type = "yes_no")
 @NotNull
 public Boolean getActive() {
     return active;
 }

The user table is defined like this (to show that the active column allows null values):

mysql> desc user;
+------------+--------------+------+-----+---------+----------------+
| Field      | Type         | Null | Key | Default | Extra          |
+------------+--------------+------+-----+---------+----------------+
| id         | bigint(20)   | NO   | PRI | NULL    | auto_increment | 
| version    | bigint(20)   | YES  |     | NULL    |                | 
| active     | char(1)      | YES  |     | NULL    |                | 
| first_name | varchar(255) | YES  |     | NULL    |                | 
| last_name  | varchar(255) | YES  |     | NULL    |                | 
| user_name  | varchar(255) | YES  |     | NULL    |                | 
+------------+--------------+------+-----+---------+----------------+
6 rows in set (0.02 sec)

Finally, I have a test that shows that a PropertyValueException is thrown instead of an InvalidStateException:

@Test(expected = PropertyValueException.class)
public void testNotNullAnnotationPreemptsNormalValidation() {
    // Explicitly set property annotated with @NotNull to null
    user.setActive(null);
    session.save(user);
}

This test passes, meaning that you get a PropertyValueException where with other validators you get an InvalidStateException. For example, here is another test that tests the validation on the username property which is annotated with @Email:

@Test(expected = InvalidStateException.class)
public void testNormalValidationErrorIfNotNullPropertyIsValid() {
    //  Active property is OK here as it gets the default value 'true' in the User class

    // But...make username invalid
    user.setUserName("bob");
    session.save(user);
}

The above test passes meaning that an InvalidStateException was thrown. So, the point of all this long-windedness is that @NotNull behaves differently than other validators and results in a completely different exception being thrown. That is the reason I don't use it and why I created the @Required annotation I showed in the last article.

In the next article, I'll show a technique to bypass validation to allow objects to be saved without the normal validation occurring (and explain a use case where bypassing validation makes sense).

Validating Domain Objects in Hibernate Part 3: Creating Your Own Validator

Posted on September 27, 2007 by Scott Leberknight

This is the third in a series of short blogs describing how the Hibernate Validator allows you to define validation rules directly on domain objects where it belongs. In the second article I showed how to configure the Hibernate Validator and showed event-based and manual validation of domain objects. Here I'll show you how to create your own validators.

The most common use case is validation of individual properties on your domain objects. For example, is a property required; does it need to match a specific pattern; must it have a minimum and maximum length; or must it be a valid credit card number? Hibernate Validator makes creating validators for specific properties easy. In addition to property-specific validators, you can also write class-level validators. For example, maybe you allow certain fields to be blank, but if one of them is entered, then several others are required as well. You annotate property-level validators on properties (i.e. getter methods) and class-level validators on your domain object itself. Here's a short example showing both types of validator:

@Entity
@UserNameConfirmation
public class User extends BaseEntity {
    
    // id, version, etc. are defined in BaseEntity
    private String userName;
    private String firstName;
    private String lastName;
    private String ssn;
    
    @Required
    @Email
    public String getUserName() { return userName; }
    public void setUserName(String userName) { this.userName = userName; }
    
    @Email
    @Transient
    public String getUserNameConfirmation() { return userNameConfirmation; }
    public void setUserNameConfirmation(String userNameConfirmation) { this.userNameConfirmation = userNameConfirmation; }
    
    @Required
    @Length(min = 2, max = 50)
    public String getFirstName () { return firstName; }
    public void setFirstName() { this.firstName = firstName; }

    @Required
    @Length(min = 2, max = 50)
    public String getLastName () { return lastName; }
    public void setLastName() { this.lastName = lastName; }
    
    @Pattern(regex = "[0-9]{3}-[0-9]{2}-[0-9]{4}")
    public String getSsn() { return ssn; }
    public void setSsn(String ssn) { this.ssn = ssn; }
}

In the above example, there is a UserNameConfirmation annotation at the class level. This applies a validator that ensures a user name and a confirmation user name match, but only if the confirmation user name is supplied. There are also several property-level validators being applied: Email, Required, Length, and Pattern. I've also marked the userNameConfirmation property as transient with the @Transient annotation, since this is not actually a persistent property and we want Hibernate to ignore it during persistence operations; it is used only for validation purposes.

So let's actually create a validator now. The @Required validator I've been using in the example code is not one of the Hibernate validators that come out of the box. It has several other ones that are similar (@NotNull and @NotEmpty) but that I don't use in practice - more on why not in the next article though. To create a validator, you only need to do two things:

  1. Define a validation annotation
  2. Implement the validator class

Without further ado, here is the @Required annotation definition:

package com.nearinfinity.hibernate.validator;

import static java.lang.annotation.ElementType.FIELD;
import static java.lang.annotation.ElementType.METHOD;
import static java.lang.annotation.RetentionPolicy.RUNTIME;

import java.lang.annotation.Documented;
import java.lang.annotation.Retention;
import java.lang.annotation.Target;

import org.hibernate.validator.ValidatorClass;

/**
 * Designates a property that is required to have a value. It cannot be null or empty. The default message is
 * "validator.required" which is assumed to exist in the expected resource bundle
 * ValidatorMessages.properties.
 */
@Documented
@ValidatorClass(RequiredValidator.class)
@Target( { METHOD, FIELD })
@Retention(RUNTIME)
public @interface Required {

    String message() default "{validator.required}";

}

The important things in this code are:

  1. You specify the validator class (the class that performs the actual validation logic) using the ValidatorClass annotation, supplying the validator class implementation as the sole argument.
  2. You need to tell Java where the annotation is permitted via the Target annotation. We'll allow the @Required annotation on methods and fields.
  3. You need to tell Java to retain this annotation at runtime via the @Retention annotation, since Hibernate uses reflection to determine the validators for domain objects.
  4. You specify a message parameter with a default value with value "validator.required" and which is internationalized in the ValidatorMessages.properties resource bundle.

If there are additional parameters you need for your own validator, you can specify them in your annotation. For example, the Hibernate @Length validation annotation specifies a min and a max, like this:

@Documented
@ValidatorClass(LengthValidator.class)
@Target({METHOD, FIELD})
@Retention(RUNTIME)
public @interface Length {
    int max() default Integer.MAX_VALUE;

    int min() default 0;

    String message() default "{validator.length}";
}

Now that we've defined the @Required validator annotation, we implement the actual validator class:

public class RequiredValidator implements Validator<Required>, Serializable {

    public void initialize(Required parameters) {
        // nothing to initialize
    }

    /**  @return true if the value is not null or an empty String */
    public boolean isValid(Object value) {
        if (value == null) {
            return false;
        }
        if (value instanceof String) {
            String stringValue = (String) value;
            if (stringValue.trim().length() == 0) {
                return false;
            }
        }
        return true;
    }
}

The important points in the validator implementation class are:

  1. The validator must implement the Hibernate Validator interface, which is parametrized by the validator annotation.
  2. You should also implement Serializable.

The Validator interface is very simple consisting of only two methods: initialize and isValid. The initialize method allows custom initialization, for example you can initialize parameters defined in your validation annotation such as the "min" and "max" in the Hibernate @Length annotation. The isValid method does the real work and validates the object supplied as an argument. That's pretty much it. Implementing class-level validators like the @UserNameConfirmation annotation I showed in an earlier example works exactly the same way. About the only difference is that you probably will restrict the annotation to types, i.e. classes using @Target({ TYPE }). Now, all that's left is to annotate your domain objects!

In the next article I'll explain my earlier statement that I don't use the @NotNull or @NotEmpty annotations in my domain objects.

Validating Domain Objects in Hibernate Part 2: Enabling Validation

Posted on September 17, 2007 by Scott Leberknight

This is the second in a series of short blogs describing how the Hibernate Validator allows you to define validation rules directly on domain objects where it belongs. In the first article I introduced the Hibernate Validator and showed a simple example of annotating a domain object. In this article I'll show you how to enable event-based validation, meaning when an event like a save or update occurs, Hibernate will automatically validate the objects being saved and throw an exception if any of them are invalid. I'll also show how you can manually validate objects using the validator API.

Prior to Hibernate Core version 3.2.4 (or around thereabouts) enabling event-based validation required explicit configuration. In plain Hibernate (i.e. standalone) you configure event-based validation like this:

<!-- Plain Hibernate Configuration File (e.g. hibernate.cfg.xml) -->
<hibernate-configuration>
  <session-factory>
    <!-- other configuration -->
    <event type="pre-update">
      <listener class="org.hibernate.validator.event.ValidateEventListener"/>
    </event>
    <event type="pre-insert">
      <listener class="org.hibernate.validator.event.ValidateEventListener"/>
    </event>
  </session-factory>
</hibernate-configuration>

Since many people use Hibernate in a Spring environment, you would add the following to the AnnotationSessionFactoryBean in your Spring application context file:

<!-- Spring-based configuration (e.g. applicationContext-hibernate.xml) -->
<bean id="sessionFactory" class="org.springframework.orm.hibernate3.annotation.AnnotationSessionFactoryBean">
  <!-- other configuration -->
  <property name="eventListeners">
    <map>
      <entry key="pre-update">
        <bean class="org.hibernate.validator.event.ValidateEventListener"/>
      </entry>
      <entry key="pre-insert">
        <bean class="org.hibernate.validator.event.ValidateEventListener"/>
      </entry>
    </map>
  </property>
</bean>

So basically all you are doing is configuring the ValidateEventListener event listener class to fire on "pre-update" and "pre-insert" events. So at runtime Hibernate will validate annotated domain objects before inserting or updating anything in the database. There is nothing particularly special here. Hibernate provides a ton of hook points into the various Hibernate events such as save, update, delete, persist, etc. via a listener model, and the Hibernate Validator simply hooks into this mechanism. Note that you need the Hibernate Validator JAR file in your CLASSPATH as it is not part of the core distribution.

As of Hibernate Core 3.2.4 (or somewhere around that version since I can't seem to find it in the release notes anywhere), Hibernate tries to help you out by auto-registering the ValidateEventListener if it is present in the CLASSPATH. Take a look at the following code snippet from the Hibernate AnnotationConfiguration class' buildSessionFactory() method:

// From org.hibernate.cfg.AnnotationConfiguration
public SessionFactory buildSessionFactory() throws HibernateException {
    // ...
    // ...add validator events if the jar is available...
    boolean enableValidatorListeners = ! 
        "false".equalsIgnoreCase( getProperty( "hibernate.validator.autoregister_listeners" ) );
    Class validateEventListenerClass = null;
    try {
        validateEventListenerClass = ReflectHelper.classForName(
                "org.hibernate.validator.event.ValidateEventListener",
                AnnotationConfiguration.class );
    }
    catch (ClassNotFoundException e) {
        //validator is not present
        log.debug( "Validator not present in classpath, ignoring event listener registration" );
    }
    
    // ...now if enableValidatorListeners is true, register a ValidateEventListener...
    // ...for pre-insert and pre-update events automagically (trying to not register if already configured)...
    
    // ...rest of method... 
}

The salient points of the above code are:

  1. Automatic registration occurs unless the hibernate.validator.autoregister_listeners property is "false."
  2. Hibernate uses reflection to determine if the ValidateEventListener class is available in the CLASSPATH.
  3. Hibernate does not register ValidateEventListener if it is already registered, e.g. via explicit configuration.

Regardless of how the configuratio has occurred, once configured everything works exactly the same. So now if you had code that saved a domain object you could catch an InvalidStateException in your code, which is the type of exception Hibernate Validator throws when validation fails. For example, you could write:

List<String> allErrors = new ArrayList<String>();
try {
    session.save(user);
}
catch (InvalidStateException ex) {
    for (InvalidValue error : ex.getInvalidValues()) {
        allErrors.add(humanize(error.getPropertyName()) + " " + error.getMessage());
    }
    // clean up...
}

That's pretty much it. You catch an InvalidStateException and from that exception you can get an array of InvalidValue objects. Each InvalidValue object contains the property name on which the validation error occurred, and a message such as "is required" or "is not a well-formed email address." The messages come from (by default) a standard Java resource bundle named ValidatorMessages.properties so the validation messages are fully internationalized depending on the locale. The property names will be the JavaBean property name, for example "firstName" so you probably need an extra translation step to convert the Java property notation to a human-readable one. In the example above I have a method named humanize that presumably translates "firstName" to "First Name" assuming a US locale.

Last, what if you want to manually validate an object? It is also very simple. The following code shows how to do it:

User user = getUserById(id);  // get object to validate somehow...

ClassValidator<User> validator = new ClassValidator<User>(User.class);
InvalidValue[] errors = validator.getInvalidValues(user);

Pretty simple. This allows you to validate domain objects before sending them to Hibernate to be persisted, which might be beneficial in certain cases. For example, you might want to perform validation in a service layer manually before sending objects to a data access tier which interacts with Hibernate. The one big difference is that event-based validation automatically validates parent and child objects (i.e. the object graph being saved) whereas the manual validation does not unless you annotate the child collection with @Valid.

In this article I've shown how to enable the Hibernate Validator and how to use event-based and manual validation of domain objects. In the next article I'll show you how to create your own validators in case you need more than the ones Hibernate Validator provides out of the box.

Validating Domain Objects in Hibernate Part 1: Introduction

Posted on September 10, 2007 by Scott Leberknight

This is the first in a series of short blogs showing how you can use Hibernate to validate your domain objects. Here I'll provide a brief introduction to validating your domain objects using Hibernate and why it matters. In future installments I'll show you how to enable the validations you apply to your domain objects, how to create your own custom validators, and provide some tips about integrating the Hibernate validator into your applications.

Every system needs data validation. In Java-based web applications using MVC frameworks like Struts, Spring MVC, or JSF, most developers simply use their framework's built-in validation scheme. Each of the aforementioned frameworks provides a way to validate form data, but this is usually restricted to the web tier. Struts provides ActionForms that have a validate() method you implement or you can use the Jakarta Commons Validator; JSF uses custom tags like <f:validateLength/> in the presentation tier; and Spring MVC has a Validator interface that can be easily plugged into Spring MVC's SimpleFormController. These solutions are either tied directly to the web tier or would require a bunch of infrastructure (or plumbing) code to make it work across all tiers seamlessly.

This is fine is many cases, but what happens when you expose functionality via a web service (I won't get into a REST vs WS-Death Star argument here, OK?) and you still need data validation? In fact usually you need the exact same validation for the domain objects. Now what? Many developers simply end up copy/pasting validation code. Ugh. Others come up with their own validation framework to keep things DRY but end up making things more complicated, plus they are writing infrastructure code instead of business logic. Along came Ruby on Rails which made it trivial to declare validation on domain objects and have that validation automatically apply no matter where the domain objects are used, i.e. in web controllers, web services, etc. This was probably most Java developers' first experience with applying validation directly to domain objects, and they were jealous (or at least I was).

Fortunately Hibernate provides the Hibernate Validator which allows you to annotate your domain objects with validation constraints. For example:

@Entity
public class User extends BaseEntity {
	
    // id, version, etc. are defined in BaseEntity
    private String userName;
    private String firstName;
    private String lastName;
    private String ssn;
	
    @Required
    @Email
    public String getUserName() { return userName; }
    public void setUserName(String userName) { this.userName = userName; }
	
    @Required
    @Length(min = 2, max = 50)
    public String getFirstName () { return firstName; }
    public void setFirstName() { this.firstName = firstName; }

    @Required
    @Length(min = 2, max = 50)
    public String getLastName () { return lastName; }
    public void setLastName() { this.lastName = lastName; }
	
    @Pattern(regex = "[0-9]{3}-[0-9]{2}-[0-9]{4}")
    public String getSsn() { return ssn; }
    public void setSsn(String ssn) { this.ssn = ssn; }
}

In the above code, we are mandating the following validation rules on all User objects:

  • User name is required and must be a well-formed email address.
  • First name is required and must be between 2 and 50 characters in length.
  • Last Name is required and must be between 2 and 50 characters in length.
  • Social Security Number is not required, but if present must match the format NNN-NN-NNNN.

With these annotations, we can now have any User object validated automatically and the same validation rules will apply no matter where the User object is used, i.e. the validation is where it should be, in the problem domain and not tied to the a specific application tier. In the next article, I'll show how to actually enable the Hibernate Validator and how to validate objects.

Spring Tip: Don't Explicitly Call Setter Methods

Posted on July 24, 2007 by Scott Leberknight

Spring has many setter methods in its classes. For example, take a look at the Hibernate support class HibernateTemplate and the Spring MVC base controller BaseCommandController. This tip is very simple:

Setter methods in Spring are for bean configuration only.

For example, say you are implementing a DAO and have extended the Spring support class HibernateDaoSupport which provides a HibernateTemplate for use in data access methods. You might have a method to search for blog entries like this:

public List findBlogEntriesByTitle(String title) {
    return getHibernateTemplate().findByNamedParam(
        "from BlogEntry e where e.title like :theTitle", "theTitle", "%" + title + "%");
}

Now let's say you have a really popular blog and want to limit the number of search results to 100. You check the HibernateTemplate JavaDocs and find there is a setMaxResults() method that looks promising. So you change your method to this:

public List findBlogEntriesByTitle(String title) {
    getHibernateTemplate().setMaxResults(100);  // Don't do this!
    return getHibernateTemplate().findByNamedParam(
        "from BlogEntry e where e.title like :theTitle", "theTitle", "%" + title + "%");
}

The above innocent-looking code has an insidious side-effect, which occurs because HibernateTemplate, like many Spring classes, is intended to be used in a thread-safe manner. In the example, calling setMaxResults sets the maximum number of results for all threads flowing through the HibernateTemplate after this method has been called, instead of just for the current Hibernate Session. While setting the maximum query results may not be a big deal, what if instead you did this:

public void updateAccountProfile(AccountProfile profile) {
    HibernateTemplate ht = getHibernateTemplate();
    int originalFlushMode = ht.getFlushMode();
    ht.setFlushMode(FlushMode.FLUSH_EAGER);  // Don't do this!
    ht.update(profile);
    ht.setFlushMode(originalFlushMode);
}

This is much worse as now the Hibernate flush mode is changed for every thread using the HibernateTemplate and causes non-deterministic flushing behavior. I have seen a project encounter this very bug and it was initially difficult to track down since most of the time everything worked just fine. As an aside, you should rarely if ever need to explicitly flush a Hibernate Session in application code.

In general, setter methods in Spring classes are intended for initial bean configuration, and should not be called at runtime as they are generally not thread-safe. So, if you want to call a setter method, your best bet is to look for an alternate, thread-safe solution. In the above example, the solution could be to use a HibernateCallback which passes you a Hibernate Session on which you can set the flush mode only for that particular Session. In any case, making sure your team understands this could save some headaches down the road, especially for developers who are new to Spring and who are used to using setter methods to change object properties at runtime, not just as an initial configuration mechanism.

Enforce Required Dependencies in Spring 2.0

Posted on July 10, 2007 by Scott Leberknight

Spring 2.0 added the @Required annotation that allows you to define which bean properties are required to be injected. In combination with the RequiredAnnotationBeanPostProcessor, Spring will blow up at application startup if any dependencies are not satisfied. In my (admittedly limited) testing of this feature, only one unsatisfied dependency is reported at a time - in other words Spring fails fast at the first missing dependency. In any case, the following is all you need to do to enable this feature.

First, annotate the setter methods for required properties.

// In some class that requires a UserDao to be injected.
@Required
public void setUserDao(UserDao userDao) {
    this.userDao = userDao;
}

Second, in one of your Spring application context files, add the following:

<bean class="org.springframework.beans.factory.annotation.RequiredAnnotationBeanPostProcessor"/>

That's it. If you want you can configure the RequiredAnnotationBeanPostProcessor to look for a different type of annotation, for example maybe you want your own @Injected annotation:

// In some class that requires a UserDao to be injected.
@Injected
public void setUserDao(UserDao userDao) {
    this.userDao = userDao;
}
<bean class="org.springframework.beans.factory.annotation.RequiredAnnotationBeanPostProcessor">
    <property name="requiredAnnotationType" value="com.acme.annotation.Injected"/>
<bean>

Overall this is a nice feature that might save you some time debugging a missing dependency and at the same time making your code a little more explicit, since the annotated setter methods tell the reader something, i.e. that this is a "special" property that is required to be set before the class can successfully be used.